Chapter 12: Deploying Django
This chapter covers the last essential step of building a Django application: deploying it to a production server.
If you’ve been following along with our ongoing examples, you’ve likely been using the runserver, which makes things very easy – with runserver, you don’t have to worry about Web server setup. But runserver is intended only for development on your local machine, not for exposure on the public Web. To deploy your Django application, you’ll need to hook it into an industrial-strength Web server such as Apache. In this chapter, we’ll show you how to do that – but, first, we’ll give you a checklist of things to do in your codebase before you go live.
Preparing Your Codebase for Production
Fortunately, the runserver approximates a “real” Web server closely enough that not very many changes need to be made to a Django application in order to make it production-ready. But there are a few essential things you should do before you turn the switch.
Turning Off Debug Mode
When we created a project in Chapter 2, the command django-admin.py startproject created a settings.py file with DEBUG set to True. Many internal parts of Django check this setting and change their behavior if DEBUG mode is on. For example, if DEBUG is set to True, then:
- All database queries will be saved in memory as the object django.db.connection.queries. As you can imagine, this eats up memory!
- Any 404 error will be rendered by Django’s special 404 error page (covered in Chapter 3) rather than returning a proper 404 response. This page contains potentially sensitive information and should not be exposed to the public Internet.
- Any uncaught exception in your Django application – from basic Python syntax errors to database errors to template syntax errors – will be rendered by the Django pretty error page that you’ve likely come to know and love. This page contains even more sensitive information than the 404 page and should never be exposed to the public.
In short, setting DEBUG to True tells Django to assume only trusted developers are using your site. The Internet is full of untrustworthy hooligans, and the first thing you should do when you’re preparing your application for deployment is set DEBUG to False.
Turning Off Template Debug Mode
Similarly, you should set TEMPLATE_DEBUG to False in production. If True, this setting tells Django’s template system to save some extra information about every template, for use on the pretty error pages.
Implementing a 404 Template
If DEBUG is True, Django displays the useful 404 error page. But if DEBUG is False, then it does something different: it renders a template called 404.html in your root template directory. So, when you’re ready to deploy, you’ll need to create this template and put a useful “Page not found” message in it.
Here’s a sample 404.html you can use as a starting point. It assumes you’re using template inheritance and have defined a base.html with blocks called title and content.
{% extends "base.html" %}

{% block title %}Page not found{% endblock %}

{% block content %}
<h1>Page not found</h1>

<p>Sorry, but the requested page could not be found.</p>
{% endblock %}
To test that your 404.html is working, just change DEBUG to False and visit a nonexistent URL. (This works on the runserver just as well as it works on a production server.)
Implementing a 500 Template
Similarly, if DEBUG is False, then Django no longer displays its useful error/traceback pages in case of an unhandled Python exception. Instead, it looks for a template called 500.html and renders it. Like 404.html, this template should live in your root template directory.
There’s one slightly tricky thing about 500.html. You can never be sure why this template is being rendered, so it shouldn’t do anything that requires a database connection or relies on any potentially broken part of your infrastructure. (For example, it should not use custom template tags.) If it uses template inheritance, then the parent template(s) shouldn’t rely on potentially broken infrastructure, either. Therefore, the best approach is to avoid template inheritance and use something very simple. Here’s an example 500.html as a starting point:
<!DOCTYPE html PUBLIC "-//W3C//DTD HTML 4.01//EN"
    "http://www.w3.org/TR/html4/strict.dtd">
<html lang="en">
<head>
    <title>Page unavailable</title>
</head>
<body>
    <h1>Page unavailable</h1>

    <p>Sorry, but the requested page is unavailable due to a
    server hiccup.</p>

    <p>Our engineers have been notified, so check back later.</p>
</body>
</html>
Setting Up Error Alerts
When your Django-powered site is running and an exception is raised, you’ll want to know about it, so you can fix it. By default, Django is configured to send an e-mail to the site developers whenever your code raises an unhandled exception – but you need to do two things to set it up.
First, change your ADMINS setting to include your e-mail address, along with the e-mail addresses of any other people who need to be notified. This setting takes a tuple of (name, email) tuples, like this:
ADMINS = (
    ('John Lennon', 'jlennon@example.com'),
    ('Paul McCartney', 'pmacca@example.com'),
)
Second, make sure your server is configured to send e-mail. Setting up postfix, sendmail or any other mail server is outside the scope of this book, but on the Django side of things, you’ll want to make sure your EMAIL_HOST setting is set to the proper hostname for your mail server. It’s set to 'localhost' by default, which works out of the box for most shared-hosting environments. You might also need to set EMAIL_HOST_USER, EMAIL_HOST_PASSWORD, EMAIL_PORT or EMAIL_USE_TLS, depending on the complexity of your arrangement.
Also, you can set EMAIL_SUBJECT_PREFIX to control the prefix Django uses in front of its error e-mails. It’s set to '[Django] ' by default.
Setting Up Broken Link Alerts
If you have the CommonMiddleware installed (e.g., if your MIDDLEWARE_CLASSES setting includes 'django.middleware.common.CommonMiddleware', which it does by default), then you have the option of receiving an e-mail any time somebody visits a page on your Django-powered site that raises 404 with a non-empty referrer – that is, every broken link. If you want to activate this feature, set SEND_BROKEN_LINK_EMAILS to True (it’s False by default), and set your MANAGERS setting to a person or people who will receive these broken-link e-mails. MANAGERS uses the same syntax as ADMINS. For example:
MANAGERS = (
    ('George Harrison', 'gharrison@example.com'),
    ('Ringo Starr', 'ringo@example.com'),
)
Note that error e-mails can get annoying; they’re not for everybody.
Using Different Settings for Production
So far in this book, we’ve dealt with only a single settings file: the settings.py generated by django-admin.py startproject. But as you get ready to deploy, you’ll likely find yourself needing multiple settings files to keep your development environment isolated from your production environment. (For example, you probably won’t want to change DEBUG from False to True whenever you want to test code changes on your local machine.) Django makes this very easy by allowing you to use multiple settings files.
If you’d like to organize your settings files into “production” and “development” settings, you can accomplish this in one of three ways:
- Set up two full-blown, independent settings files.
- Set up a “base” settings file (say, for development) and a second (say, production) settings file that merely imports from the first one and defines whatever overrides it needs to define.
- Use only a single settings file that has Python logic to change the settings based on context.
We’ll take these one at a time.
First, the most basic approach is to define two separate settings files. If you’re following along, you’ve already got settings.py. Now, just make a copy of it called settings_production.py. (We made this name up; you can call it whatever you want.) In this new file, change DEBUG, etc.
The second approach is similar but cuts down on redundancy. Instead of having two settings files whose contents are mostly similar, you can treat one as the “base” file and create another file that imports from it. For example:
# settings.py

DEBUG = True
TEMPLATE_DEBUG = DEBUG

DATABASE_ENGINE = 'postgresql_psycopg2'
DATABASE_NAME = 'devdb'
DATABASE_USER = ''
DATABASE_PASSWORD = ''
DATABASE_PORT = ''

# ...

# settings_production.py

from settings import *

DEBUG = TEMPLATE_DEBUG = False
DATABASE_NAME = 'production'
DATABASE_USER = 'app'
DATABASE_PASSWORD = 'letmein'
Here, settings_production.py imports everything from settings.py and just redefines the settings that are particular to production. In this case, DEBUG is set to False, but we’ve also set different database access parameters for the production setting. (The latter goes to show that you can redefine any setting, not just the basic ones like DEBUG.)
Finally, the most concise way of accomplishing two settings environments is to use a single settings file that branches based on the environment. One way to do this is to check the current hostname. For example:
# settings.py

import socket

if socket.gethostname() == 'my-laptop':
    DEBUG = TEMPLATE_DEBUG = True
else:
    DEBUG = TEMPLATE_DEBUG = False

# ...
Here, we import the socket module from Python’s standard library and use it to check the current system’s hostname. We can check the hostname to determine whether the code is being run on the production server.
A core lesson here is that settings files are just Python code. They can import from other files, they can execute arbitrary logic, etc. Just make sure that, if you go down this road, the Python code in your settings files is bulletproof. If it raises any exceptions, Django will likely crash badly.
Renaming settings.py
Feel free to rename your settings.py to settings_dev.py or settings/dev.py or foobar.py – Django doesn’t care, as long as you tell it what settings file you’re using.
But if you do rename the settings.py file that is generated by django-admin.py startproject, you’ll find that manage.py will give you an error message saying that it can’t find the settings. That’s because it tries to import a module called settings. You can fix this either by editing manage.py to change settings to the name of your module, or by using django-admin.py instead of manage.py. In the latter case, you’ll need to set the DJANGO_SETTINGS_MODULE environment variable to the Python path to your settings file (e.g., 'mysite.settings').
DJANGO_SETTINGS_MODULE
With those code changes out of the way, the next part of this chapter will focus on deployment instructions for specific environments, such as Apache. The instructions are different for each environment, but one thing remains the same: in each case, you will have to tell the Web server your DJANGO_SETTINGS_MODULE. This is the entry point into your Django application. The DJANGO_SETTINGS_MODULE points to your settings file, which points to your ROOT_URLCONF, which points to your views, and so on.
DJANGO_SETTINGS_MODULE is the Python path to your settings file. For example, assuming the mysite directory is on your Python path, the DJANGO_SETTINGS_MODULE for our ongoing example is 'mysite.settings'.
Using Django with Apache and mod_python
Apache with mod_python historically has been the suggested setup for using Django on a production server.
mod_python (http://www.djangoproject.com/r/mod_python/) is an Apache plug-in that embeds Python within Apache and loads Python code into memory when the server starts. Code stays in memory throughout the life of an Apache process, which leads to significant performance gains over other server arrangements.
Django requires Apache 2.x and mod_python 3.x.
Note
Configuring Apache is well beyond the scope of this book, so we’ll simply mention details as needed. Luckily, many great resources are available if you need to learn more about Apache. A few of them we like are:
- The free online Apache documentation, available via http://www.djangoproject.com/r/apache/docs/
- Pro Apache, Third Edition (Apress, 2004) by Peter Wainwright, available via http://www.djangoproject.com/r/books/pro-apache/
- Apache: The Definitive Guide, Third Edition (O’Reilly, 2002) by Ben Laurie and Peter Laurie, available via http://www.djangoproject.com/r/books/pro-apache/
Basic Configuration
To configure Django with mod_python, first make sure you have Apache installed with the mod_python module activated. This usually means having a LoadModule directive in your Apache configuration file. It will look something like this:
LoadModule python_module /usr/lib/apache2/modules/mod_python.so
Then, edit your Apache configuration file and add a <Location> directive that ties a specific URL path to a specific Django installation. For example:
<Location "/">
    SetHandler python-program
    PythonHandler django.core.handlers.modpython
    SetEnv DJANGO_SETTINGS_MODULE mysite.settings
    PythonDebug Off
</Location>
Make sure to replace mysite.settings with the appropriate DJANGO_SETTINGS_MODULE for your site.
This tells Apache, “Use mod_python for any URL at or under ‘/’, using the Django mod_python handler.” It passes the value of DJANGO_SETTINGS_MODULE so mod_python knows which settings to use.
Note that we’re using the <Location> directive, not the <Directory> directive. The latter is used for pointing at places on your filesystem, whereas <Location> points at places in the URL structure of a Web site. <Directory> would be meaningless here.
Apache likely runs as a different user than your normal login and may have a different path and sys.path. You may need to tell mod_python how to find your project and Django itself.
PythonPath "['/path/to/project', '/path/to/django'] + sys.path"
You can also add directives such as PythonAutoReload Off for performance. See the mod_python documentation for a full list of options.
Note that you should set PythonDebug Off on a production server. If you leave PythonDebug On, your users will see ugly (and revealing) Python tracebacks if something goes wrong within mod_python.
Restart Apache, and any request to your site (or virtual host if you’ve put this directive inside a <VirtualHost> block) will be served by Django.
Running Multiple Django Installations on the Same Apache Instance
It’s entirely possible to run multiple Django installations on the same Apache instance. You might want to do this if you’re an independent Web developer with multiple clients but only a single server.
To accomplish this, just use VirtualHost like so:
NameVirtualHost *

<VirtualHost *>
    ServerName www.example.com
    # ...
    SetEnv DJANGO_SETTINGS_MODULE mysite.settings
</VirtualHost>

<VirtualHost *>
    ServerName www2.example.com
    # ...
    SetEnv DJANGO_SETTINGS_MODULE mysite.other_settings
</VirtualHost>
If you need to put two Django installations within the same VirtualHost, you’ll need to take a special precaution to ensure mod_python’s code cache doesn’t mess things up. Use the PythonInterpreter directive to give different <Location> directives separate interpreters:
<VirtualHost *>
    ServerName www.example.com
    # ...
    <Location "/something">
        SetEnv DJANGO_SETTINGS_MODULE mysite.settings
        PythonInterpreter mysite
    </Location>

    <Location "/otherthing">
        SetEnv DJANGO_SETTINGS_MODULE mysite.other_settings
        PythonInterpreter mysite_other
    </Location>
</VirtualHost>
The values of PythonInterpreter don’t really matter, as long as they’re different between the two Location blocks.
Running a Development Server with mod_python
Because mod_python caches loaded Python code, when deploying Django sites on mod_python you’ll need to restart Apache each time you make changes to your code. This can be a hassle, so here’s a quick trick to avoid it: just add MaxRequestsPerChild 1 to your config file to force Apache to reload everything for each request. But don’t do that on a production server, or we’ll revoke your Django privileges.
If you’re the type of programmer who debugs using scattered print statements (we are), note that print statements have no effect in mod_python; they don’t appear in the Apache log, as you might expect. If you have the need to print debugging information in a mod_python setup, you’ll probably want to use Python’s standard logging package. More information is available at http://docs.python.org/lib/module-logging.html.
Serving Django and Media Files from the Same Apache Instance
Django should not be used to serve media files itself; leave that job to whichever Web server you choose. We recommend using a separate Web server (i.e., one that’s not also running Django) for serving media. For more information, see the “Scaling” section.
If, however, you have no option but to serve media files on the same Apache VirtualHost as Django, here’s how you can turn off mod_python for a particular part of the site:
<Location "/media/">
    SetHandler None
</Location>
Change Location to the root URL of your media files.
You can also use <LocationMatch> to match a regular expression. For example, this sets up Django at the site root but explicitly disables Django for the media subdirectory and any URL that ends with .jpg, .gif, or .png:
<Location "/">
    SetHandler python-program
    PythonHandler django.core.handlers.modpython
    SetEnv DJANGO_SETTINGS_MODULE mysite.settings
</Location>

<Location "/media/">
    SetHandler None
</Location>

<LocationMatch "\.(jpg|gif|png)$">
    SetHandler None
</LocationMatch>
In all of these cases, you’ll need to set the DocumentRoot directive so Apache knows where to find your static files.
Error Handling
When you use Apache/mod_python, errors will be caught by Django – in other words, they won’t propagate to the Apache level and won’t appear in the Apache error_log.
The exception to this is if something is really messed up in your Django setup. In that case, you’ll see an ominous “Internal Server Error” page in your browser and the full Python traceback in your Apache error_log file. The error_log traceback is spread over multiple lines. (Yes, this is ugly and rather hard to read, but it’s how mod_python does things.)
Handling a Segmentation Fault
Sometimes, Apache segfaults when you install Django. When this happens, it’s almost always one of two causes mostly unrelated to Django itself:
- It may be that your Python code is importing the pyexpat module (used for XML parsing), which may conflict with the version embedded in Apache. For full information, see “Expat Causing Apache Crash” at http://www.djangoproject.com/r/articles/expat-apache-crash/.
- It may be because you’re running mod_python and mod_php in the same Apache instance, with MySQL as your database backend. In some cases, this causes a known mod_python issue due to version conflicts in PHP and the Python MySQL back-end. There’s full information in a mod_python FAQ entry, accessible via http://www.djangoproject.com/r/articles/php-modpython-faq/.
If you continue to have problems setting up mod_python, a good thing to do is get a bare-bones mod_python site working, without the Django framework. This is an easy way to isolate mod_python-specific problems. The article “Getting mod_python Working” details this procedure: http://www.djangoproject.com/r/articles/getting-modpython-working/.
The next step should be to edit your test code and add an import of any Django-specific code you’re using – your views, your models, your URLconf, your RSS configuration, and so forth. Put these imports in your test handler function and access your test URL in a browser. If this causes a crash, you’ve confirmed it’s the importing of Django code that causes the problem. Gradually reduce the set of imports until it stops crashing, so as to find the specific module that causes the problem. Drop down further into modules and look into their imports as necessary. For more help, system tools like ldconfig on Linux, otool on Mac OS, and ListDLLs (from SysInternals) on Windows can help you identify shared dependencies and possible version conflicts.
An Alternative: mod_wsgi
As an alternative to mod_python, you might consider using mod_wsgi (http://code.google.com/p/modwsgi/), which has been developed more recently than mod_python and is getting some traction in the Django community. A full overview is outside the scope of this book, but see the official Django documentation for more information.
Using Django with FastCGI
Although Django under Apache and mod_python is the most robust deployment setup, many people use shared hosting, on which FastCGI is the only available deployment option.
Additionally, in some situations, FastCGI allows better security and possibly better performance than mod_python. For small sites, FastCGI can also be more lightweight than Apache.
FastCGI Overview
FastCGI is an efficient way of letting an external application serve pages to a Web server. The Web server delegates the incoming Web requests (via a socket) to FastCGI, which executes the code and passes the response back to the Web server, which, in turn, passes it back to the client’s Web browser.
Like mod_python, FastCGI allows code to stay in memory, allowing requests to be served with no startup time. Unlike mod_python, a FastCGI process doesn’t run inside the Web server process, but in a separate, persistent process.
Why Run Code in a Separate Process?
The traditional mod_* arrangements in Apache embed various scripting languages (most notably PHP, Python/mod_python, and Perl/mod_perl) inside the process space of your Web server. Although this lowers startup time (because code doesn’t have to be read off disk for every request), it comes at the cost of memory use.
Each Apache process gets a copy of the Apache engine, complete with all the features of Apache that Django simply doesn’t take advantage of. FastCGI processes, on the other hand, only have the memory overhead of Python and Django.
Due to the nature of FastCGI, it’s also possible to have processes that run under a different user account than the Web server process. That’s a nice security benefit on shared systems, because it means you can secure your code from other users.
Before you can start using FastCGI with Django, you’ll need to install flup, a Python library for dealing with FastCGI. Some users have reported stalled pages with older flup versions, so you may want to use the latest SVN version. Get flup at http://www.djangoproject.com/r/flup/.
Running Your FastCGI Server
FastCGI operates on a client/server model, and in most cases you’ll be starting the FastCGI server process on your own. Your Web server (be it Apache, lighttpd, or otherwise) contacts your Django-FastCGI process only when the server needs a dynamic page to be loaded. Because the daemon is already running with the code in memory, it’s able to serve the response very quickly.
Note
If you’re on a shared hosting system, you’ll probably be forced to use Web server-managed FastCGI processes. If you’re in this situation, you should read the section titled “Running Django on a Shared-Hosting Provider with Apache,” below.
A Web server can connect to a FastCGI server in one of two ways: it can use either a Unix domain socket (a named pipe on Win32 systems) or a TCP socket. What you choose is a manner of preference; a TCP socket is usually easier due to permissions issues.
To start your server, first change into the directory of your project (wherever your manage.py is), and then run manage.py with the runfcgi command:
./manage.py runfcgi [options]
If you specify help as the only option after runfcgi, a list of all the available options will display.
You’ll need to specify either a socket or both host and port. Then, when you set up your Web server, you’ll just need to point it at the socket or host/port you specified when starting the FastCGI server.
A few examples should help explain this:
Running a threaded server on a TCP port:
./manage.py runfcgi method=threaded host=127.0.0.1 port=3033
Running a preforked server on a Unix domain socket:
./manage.py runfcgi method=prefork socket=/home/user/mysite.sock pidfile=django.pid
Run without daemonizing (backgrounding) the process (good for debugging):
./manage.py runfcgi daemonize=false socket=/tmp/mysite.sock
Stopping the FastCGI Daemon
If you have the process running in the foreground, it’s easy enough to stop it: simply press Ctrl+C to stop and quit the FastCGI server. However, when you’re dealing with background processes, you’ll need to resort to the Unix kill command.
If you specify the pidfile option to your manage.py runfcgi, you can kill the running FastCGI daemon like this:
kill `cat $PIDFILE`
where $PIDFILE is the pidfile you specified.
To easily restart your FastCGI daemon on Unix, you can use this small shell script:
#!/bin/bash

# Replace these three settings.
PROJDIR="/home/user/myproject"
PIDFILE="$PROJDIR/mysite.pid"
SOCKET="$PROJDIR/mysite.sock"

cd $PROJDIR
if [ -f $PIDFILE ]; then
    kill `cat -- $PIDFILE`
    rm -f -- $PIDFILE
fi

exec /usr/bin/env - \
  PYTHONPATH="../python:.." \
  ./manage.py runfcgi socket=$SOCKET pidfile=$PIDFILE
Using Django with Apache and FastCGI
To use Django with Apache and FastCGI, you’ll need Apache installed and configured, with mod_fastcgi installed and enabled. Consult the Apache and mod_fastcgi documentation for instructions: http://www.djangoproject.com/r/mod_fastcgi/.
Once you’ve completed the setup, point Apache at your Django FastCGI instance by editing the httpd.conf (Apache configuration) file. You’ll need to do two things:
- Use the FastCGIExternalServer directive to specify the location of your FastCGI server.
- Use mod_rewrite to point URLs at FastCGI as appropriate.
Specifying the Location of the FastCGI Server
The FastCGIExternalServer directive tells Apache how to find your FastCGI server. As the FastCGIExternalServer docs (http://www.djangoproject.com/r/mod_fastcgi/FastCGIExternalServer/) explain, you can specify either a socket or a host. Here are examples of both:
# Connect to FastCGI via a socket/named pipe:
FastCGIExternalServer /home/user/public_html/mysite.fcgi -socket /home/user/mysite.sock

# Connect to FastCGI via a TCP host/port:
FastCGIExternalServer /home/user/public_html/mysite.fcgi -host 127.0.0.1:3033
In either case, the the directory /home/user/public_html/ should exist, though the file /home/user/public_html/mysite.fcgi doesn’t actually have to exist. It’s just a URL used by the Web server internally – a hook for signifying which requests at a URL should be handled by FastCGI. (More on this in the next section.)
Using mod_rewrite to Point URLs at FastCGI
The second step is telling Apache to use FastCGI for URLs that match a certain pattern. To do this, use the mod_rewrite module and rewrite URLs to mysite.fcgi (or whatever you specified in the FastCGIExternalServer directive, as explained in the previous section).
In this example, we tell Apache to use FastCGI to handle any request that doesn’t represent a file on the filesystem and doesn’t start with /media/. This is probably the most common case, if you’re using Django’s admin site:
<VirtualHost 12.34.56.78>
  ServerName example.com
  DocumentRoot /home/user/public_html
  Alias /media /home/user/python/django/contrib/admin/media
  RewriteEngine On
  RewriteRule ^/(media.*)$ /$1 [QSA,L]
  RewriteCond %{REQUEST_FILENAME} !-f
  RewriteRule ^/(.*)$ /mysite.fcgi/$1 [QSA,L]
</VirtualHost>
FastCGI and lighttpd
lighttpd (http://www.djangoproject.com/r/lighttpd/) is a lightweight Web server commonly used for serving static files. It supports FastCGI natively and thus is also an ideal choice for serving both static and dynamic pages, if your site doesn’t have any Apache-specific needs.
Make sure mod_fastcgi is in your modules list, somewhere after mod_rewrite and mod_access, but not after mod_accesslog. You’ll probably want mod_alias as well, for serving admin media.
Add the following to your lighttpd config file:
server.document-root = "/home/user/public_html"
fastcgi.server = (
    "/mysite.fcgi" => (
        "main" => (
            # Use host / port instead of socket for TCP fastcgi
            # "host" => "127.0.0.1",
            # "port" => 3033,
            "socket" => "/home/user/mysite.sock",
            "check-local" => "disable",
        )
    ),
)
alias.url = (
    "/media/" => "/home/user/django/contrib/admin/media/",
)

url.rewrite-once = (
    "^(/media.*)$" => "$1",
    "^/favicon\.ico$" => "/media/favicon.ico",
    "^(/.*)$" => "/mysite.fcgi$1",
)
Running Multiple Django Sites on One lighttpd Instance
lighttpd lets you use “conditional configuration” to allow configuration to be customized per host. To specify multiple FastCGI sites, just add a conditional block around your FastCGI config for each site:
# If the hostname is 'www.example1.com'...
$HTTP["host"] == "www.example1.com" {
    server.document-root = "/foo/site1"
    fastcgi.server = (
       ...
    )
    ...
}

# If the hostname is 'www.example2.com'...
$HTTP["host"] == "www.example2.com" {
    server.document-root = "/foo/site2"
    fastcgi.server = (
       ...
    )
    ...
}
You can also run multiple Django installations on the same site simply by specifying multiple entries in the fastcgi.server directive. Add one FastCGI host for each.
Scaling
Now that you know how to get Django running on a single server, let’s look at how you can scale out a Django installation. This section walks through how a site might scale from a single server to a large-scale cluster that could serve millions of hits an hour.
It’s important to note, however, that nearly every large site is large in different ways, so scaling is anything but a one-size-fits-all operation. The following coverage should suffice to show the general principle, and whenever possible we’ll try to point out where different choices could be made.
First off, we’ll make a pretty big assumption and exclusively talk about scaling under Apache and mod_python. Though we know of a number of successful medium- to large-scale FastCGI deployments, we’re much more familiar with Apache.
Running on a Single Server
Most sites start out running on a single server, with an architecture that looks something like Figure 12-1.
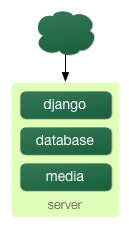
Figure 12-1: a single server Django setup.
This works just fine for small- to medium-sized sites, and it’s relatively cheap – you can put together a single-server site designed for Django for well under $3,000.
However, as traffic increases you’ll quickly run into resource contention between the different pieces of software. Database servers and Web servers love to have the entire server to themselves, so when run on the same server they often end up “fighting” over the same resources (RAM, CPU) that they’d prefer to monopolize.
This is solved easily by moving the database server to a second machine, as explained in the following section.
Separating Out the Database Server
As far as Django is concerned, the process of separating out the database server is extremely easy: you’ll simply need to change the DATABASE_HOST setting to the IP or DNS name of your database server. It’s probably a good idea to use the IP if at all possible, as relying on DNS for the connection between your Web server and database server isn’t recommended.
With a separate database server, our architecture now looks like Figure 12-2.
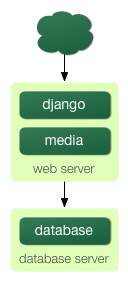
Figure 12-2: Moving the database onto a dedicated server.
Here we’re starting to move into what’s usually called n-tier architecture. Don’t be scared by the buzzword – it just refers to the fact that different “tiers” of the Web stack get separated out onto different physical machines.
At this point, if you anticipate ever needing to grow beyond a single database server, it’s probably a good idea to start thinking about connection pooling and/or database replication. Unfortunately, there’s not nearly enough space to do those topics justice in this book, so you’ll need to consult your database’s documentation and/or community for more information.
Running a Separate Media Server
We still have a big problem left over from the single-server setup: the serving of media from the same box that handles dynamic content.
Those two activities perform best under different circumstances, and by smashing them together on the same box you end up with neither performing particularly well. So the next step is to separate out the media – that is, anything not generated by a Django view – onto a dedicated server (see Figure 12-3).
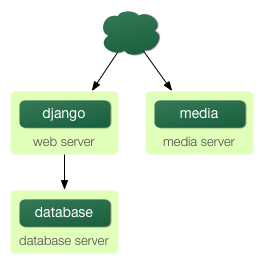
Figure 12-3: Separating out the media server.
Ideally, this media server should run a stripped-down Web server optimized for static media delivery. lighttpd and tux (http://www.djangoproject.com/r/tux/) are both excellent choices here, but a heavily stripped down Apache could work, too.
For sites heavy in static content (photos, videos, etc.), moving to a separate media server is doubly important and should likely be the first step in scaling up.
This step can be slightly tricky, however. If your application involves file uploads, Django needs to be able to write uploaded media to the media server. If media lives on another server, you’ll need to arrange a way for that write to happen across the network.
Implementing Load Balancing and Redundancy
At this point, we’ve broken things down as much as possible. This three-server setup should handle a very large amount of traffic – we served around 10 million hits a day from an architecture of this sort – so if you grow further, you’ll need to start adding redundancy.
This is a good thing, actually. One glance at Figure 12-3 shows you that if even a single one of your three servers fails, you’ll bring down your entire site. So as you add redundant servers, not only do you increase capacity, but you also increase reliability.
For the sake of this example, let’s assume that the Web server hits capacity first. It’s relatively easy to get multiple copies of a Django site running on different hardware – just copy all the code onto multiple machines, and start Apache on both of them.
However, you’ll need another piece of software to distribute traffic over your multiple servers: a load balancer. You can buy expensive and proprietary hardware load balancers, but there are a few high-quality open source software load balancers out there.
Apache’s mod_proxy is one option, but we’ve found Perlbal (http://www.djangoproject.com/r/perlbal/) to be fantastic. It’s a load balancer and reverse proxy written by the same folks who wrote memcached (see Chapter 15).
Note
If you’re using FastCGI, you can accomplish this same distribution/load balancing step by separating your front-end Web servers and back-end FastCGI processes onto different machines. The front-end server essentially becomes the load balancer, and the back-end FastCGI processes replace the Apache/mod_python/Django servers.
With the Web servers now clustered, our evolving architecture starts to look more complex, as shown in Figure 12-4.
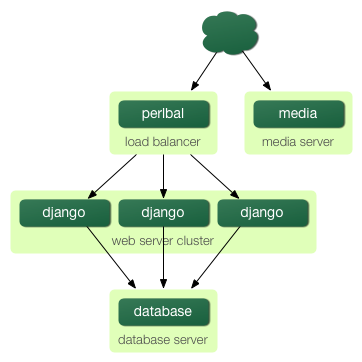
Figure 12-4: A load-balanced, redundant server setup.
Notice that in the diagram the Web servers are referred to as a “cluster” to indicate that the number of servers is basically variable. Once you have a load balancer out front, you can easily add and remove back-end Web servers without a second of downtime.
Going Big
At this point, the next few steps are pretty much derivatives of the last one:
- As you need more database performance, you might want to add replicated database servers. MySQL includes built-in replication; PostgreSQL users should look into Slony (http://www.djangoproject.com/r/slony/) and pgpool (http://www.djangoproject.com/r/pgpool/) for replication and connection pooling, respectively.
- If the single load balancer isn’t enough, you can add more load balancer machines out front and distribute among them using round-robin DNS.
- If a single media server doesn’t suffice, you can add more media servers and distribute the load with your load-balancing cluster.
- If you need more cache storage, you can add dedicated cache servers.
- At any stage, if a cluster isn’t performing well, you can add more servers to the cluster.
After a few of these iterations, a large-scale architecture might look like Figure 12-5.

Figure 12-5. An example large-scale Django setup.
Though we’ve shown only two or three servers at each level, there’s no fundamental limit to how many you can add.
Performance Tuning
If you have huge amount of money, you can just keep throwing hardware at scaling problems. For the rest of us, though, performance tuning is a must.
Note
Incidentally, if anyone with monstrous gobs of cash is actually reading this book, please consider a substantial donation to the Django Foundation. We accept uncut diamonds and gold ingots, too.
Unfortunately, performance tuning is much more of an art than a science, and it is even more difficult to write about than scaling. If you’re serious about deploying a large-scale Django application, you should spend a great deal of time learning how to tune each piece of your stack.
The following sections, though, present a few Django-specific tuning tips we’ve discovered over the years.
There’s No Such Thing As Too Much RAM
Even the really expensive RAM is relatively affordable these days. Buy as much RAM as you can possibly afford, and then buy a little bit more.
Faster processors won’t improve performance all that much; most Web servers spend up to 90% of their time waiting on disk I/O. As soon as you start swapping, performance will just die. Faster disks might help slightly, but they’re much more expensive than RAM, such that it doesn’t really matter.
If you have multiple servers, the first place to put your RAM is in the database server. If you can afford it, get enough RAM to get fit your entire database into memory. This shouldn’t be too hard; we’ve developed a site with more than half a million newspaper articles, and it took under 2GB of space.
Next, max out the RAM on your Web server. The ideal situation is one where neither server swaps – ever. If you get to that point, you should be able to withstand most normal traffic.
Turn Off Keep-Alive
Keep-Alive is a feature of HTTP that allows multiple HTTP requests to be served over a single TCP connection, avoiding the TCP setup/teardown overhead.
This looks good at first glance, but it can kill the performance of a Django site. If you’re properly serving media from a separate server, each user browsing your site will only request a page from your Django server every ten seconds or so. This leaves HTTP servers waiting around for the next keep-alive request, and an idle HTTP server just consumes RAM that an active one should be using.
Use memcached
Although Django supports a number of different cache back-ends, none of them even come close to being as fast as memcached. If you have a high-traffic site, don’t even bother with the other backends – go straight to memcached.
Use memcached Often
Of course, selecting memcached does you no good if you don’t actually use it. Chapter 15 is your best friend here: learn how to use Django’s cache framework, and use it everywhere possible. Aggressive, preemptive caching is usually the only thing that will keep a site up under major traffic.
Join the Conversation
Each piece of the Django stack – from Linux to Apache to PostgreSQL or MySQL – has an awesome community behind it. If you really want to get that last 1% out of your servers, join the open source communities behind your software and ask for help. Most free-software community members will be happy to help.
And also be sure to join the Django community. Your humble authors are only two members of an incredibly active, growing group of Django developers. Our community has a huge amount of collective experience to offer.
What’s Next?
The remaining chapters focus on other Django features that you may or may not need, depending on your application. Feel free to read them in any order you choose.
This work is licensed under the GNU Free Document License.