Chapter 6: The Django Admin Site
For a certain class of Web sites, an admin interface is an essential part of the infrastructure. This is a Web-based interface, limited to trusted site administrators, that enables the adding, editing and deletion of site content. Some common examples: the interface you use to post to your blog, the backend site managers use to moderate user-generated comments, the tool your clients use to update the press releases on the Web site you built for them.
There’s a problem with admin interfaces, though: it’s boring to build them. Web development is fun when you’re developing public-facing functionality, but building admin interfaces is always the same. You have to authenticate users, display and handle forms, validate input, and so on. It’s boring, and it’s repetitive.
So what’s Django’s approach to these boring, repetitive tasks? It does it all for you – in just a couple of lines of code, no less. With Django, building an admin interface is a solved problem.
This chapter is about Django’s automatic admin interface. The feature works by reading metadata in your model to provide a powerful and production-ready interface that site administrators can start using immediately. Here, we discuss how to activate, use, and customize this feature.
Note that we recommend reading this chapter even if you don’t intend to use the Django admin site, because we introduce a few concepts that apply to all of Django, regardless of admin-site usage.
The django.contrib packages
Django’s automatic admin is part of a larger suite of Django functionality called django.contrib – the part of the Django codebase that contains various useful add-ons to the core framework. You can think of django.contrib as Django’s equivalent of the Python standard library – optional, de facto implementations of common patterns. They’re bundled with Django so that you don’t have to reinvent the wheel in your own applications.
The admin site is the first part of django.contrib that we’re covering in this book; technically, it’s called django.contrib.admin. Other available features in django.contrib include a user authentication system (django.contrib.auth), support for anonymous sessions (django.contrib.sessions) and even a system for user comments (django.contrib.comments). You’ll get to know the various django.contrib features as you become a Django expert, and we’ll spend some more time discussing them in Chapter 16. For now, just know that Django ships with many nice add-ons, and django.contrib is generally where they live.
Activating the Admin Interface
The Django admin site is entirely optional, because only certain types of sites need this functionality. That means you’ll need to take a few steps to activate it in your project.
First, make a few changes to your settings file:
- Add 'django.contrib.admin' to the INSTALLED_APPS setting. (The order of INSTALLED_APPS doesn’t matter, but we like to keep things alphabetical so it’s easy for a human to read.)
- Make sure INSTALLED_APPS contains 'django.contrib.auth', 'django.contrib.contenttypes', 'django.contrib.messages' and 'django.contrib.sessions'. The Django admin site requires these three packages. (If you’re following along with our ongoing mysite project, note that we commented out these four INSTALLED_APPS entries in Chapter 5. Uncomment them now.)
- Make sure MIDDLEWARE_CLASSES contains 'django.middleware.common.CommonMiddleware', 'django.contrib.messages.middleware.MessageMiddleware', 'django.contrib.sessions.middleware.SessionMiddleware' and 'django.contrib.auth.middleware.AuthenticationMiddleware'. (Again, if you’re following along, note that we commented them out in Chapter 5, so uncomment them.)
Second, run python manage.py syncdb. This step will install the extra database tables that the admin interface uses. The first time you run syncdb with 'django.contrib.auth' in INSTALLED_APPS, you’ll be asked about creating a superuser. If you don’t do this, you’ll need to run python manage.py createsuperuser separately to create an admin user account; otherwise, you won’t be able to log in to the admin site. (Potential gotcha: the python manage.py createsuperuser command is only available if 'django.contrib.auth' is in your INSTALLED_APPS.)
Third, add the admin site to your URLconf (in urls.py, remember). By default, the urls.py generated by django-admin.py startproject contains commented-out code for the Django admin, and all you have to do is uncomment it. For the record, here are the bits you need to make sure are in there:
# Include these import statements...
from django.contrib import admin
admin.autodiscover()

# And include this URLpattern...
urlpatterns = patterns('',
    # ...
    (r'^admin/', include(admin.site.urls)),
    # ...
)
With that bit of configuration out of the way, now you can see the Django admin site in action. Just run the development server (python manage.py runserver, as in previous chapters) and visit http://127.0.0.1:8000/admin/ in your Web browser.
Using the Admin Site
The admin site is designed to be used by nontechnical users, and as such it should be pretty self-explanatory. Nevertheless, we’ll give you a quick walkthrough of the basic features.
The first thing you’ll see is a login screen, as shown in Figure 6-1.
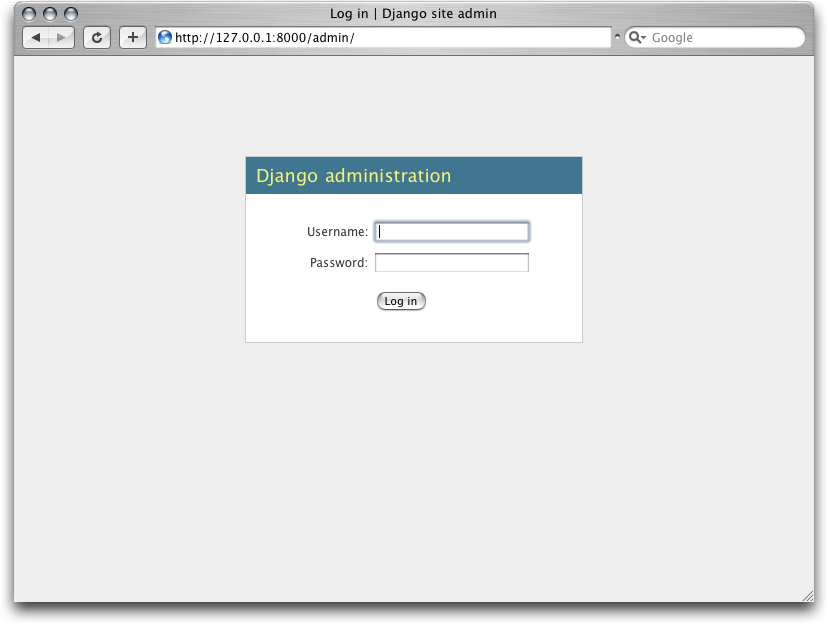
Figure 6-1. Django’s login screen
Log in with the username and password you set up when you added your superuser. If you’re unable to log in, make sure you’ve actually created a superuser – try running python manage.py createsuperuser.
Once you’re logged in, the first thing you’ll see will be the admin home page. This page lists all the available types of data that can be edited on the admin site. At this point, because we haven’t activated any of our own models yet, the list is sparse: it includes only Groups and Users, which are the two default admin-editable models.
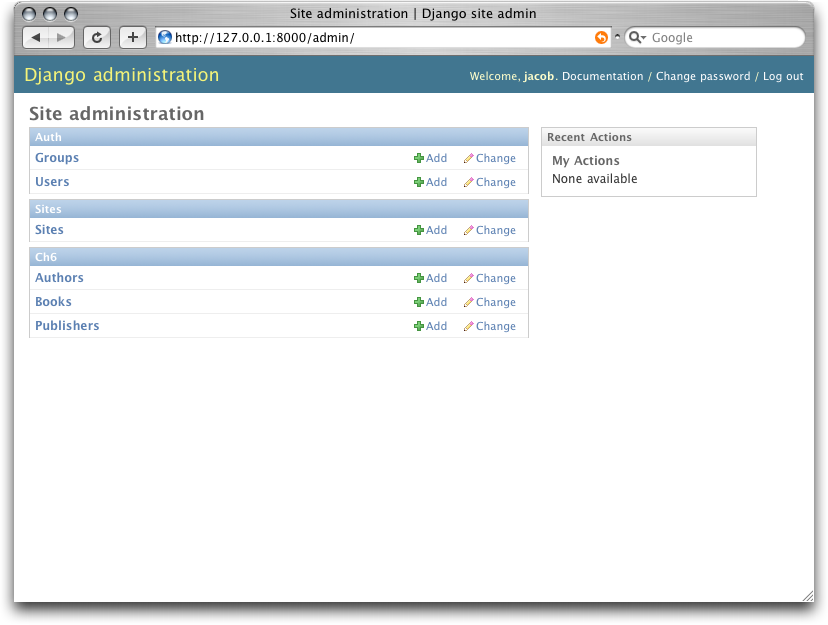
Figure 6-2. The Django admin home page
Each type of data in the Django admin site has a change list and an edit form. Change lists show you all the available objects in the database, and edit forms let you add, change or delete particular records in your database.
Other languages
If your primary language is not English and your Web browser is configured to prefer a language other than English, you can make a quick change to see whether the Django admin site has been translated into your language. Just add 'django.middleware.locale.LocaleMiddleware' to your MIDDLEWARE_CLASSES setting, making sure it appears after 'django.contrib.sessions.middleware.SessionMiddleware'.
When you’ve done that, reload the admin index page. If a translation for your language is available, then the various parts of the interface – from the “Change password” and “Log out” links at the top of the page, to the “Groups” and “Users” links in the middle – will appear in your language instead of English. Django ships with translations for dozens of languages.
For much more on Django’s internationalization features, see Chapter 19.
Click the “Change” link in the “Users” row to load the change list page for users.
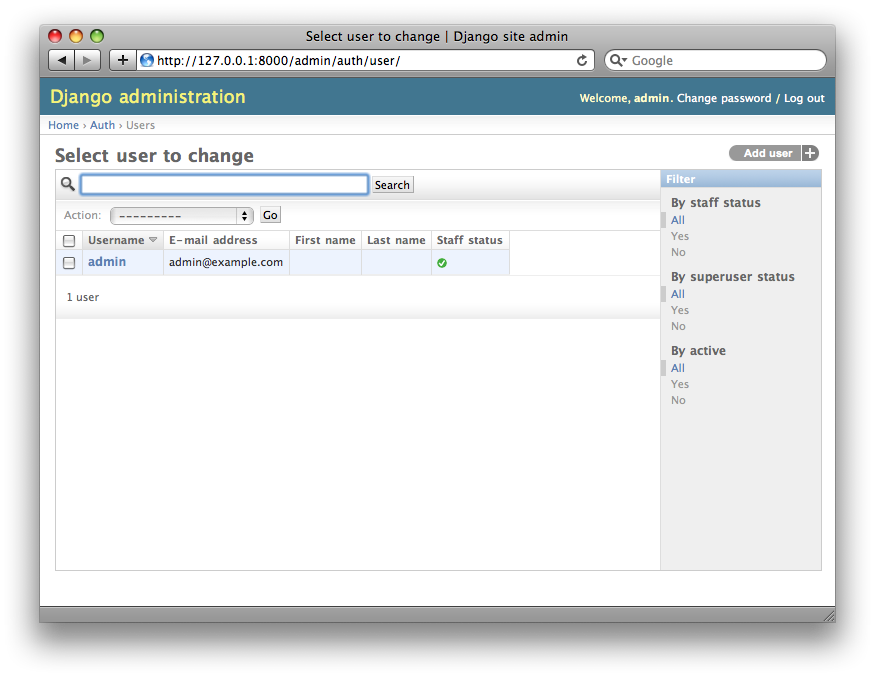
Figure 6-3. The user change list page
This page displays all users in the database; you can think of it as a prettied-up Web version of a SELECT * FROM auth_user; SQL query. If you’re following along with our ongoing example, you’ll only see one user here, assuming you’ve added only one, but once you have more users, you’ll probably find the filtering, sorting and searching options useful. Filtering options are at right, sorting is available by clicking a column header, and the search box at the top lets you search by username.
Click the username of the user you created, and you’ll see the edit form for that user.
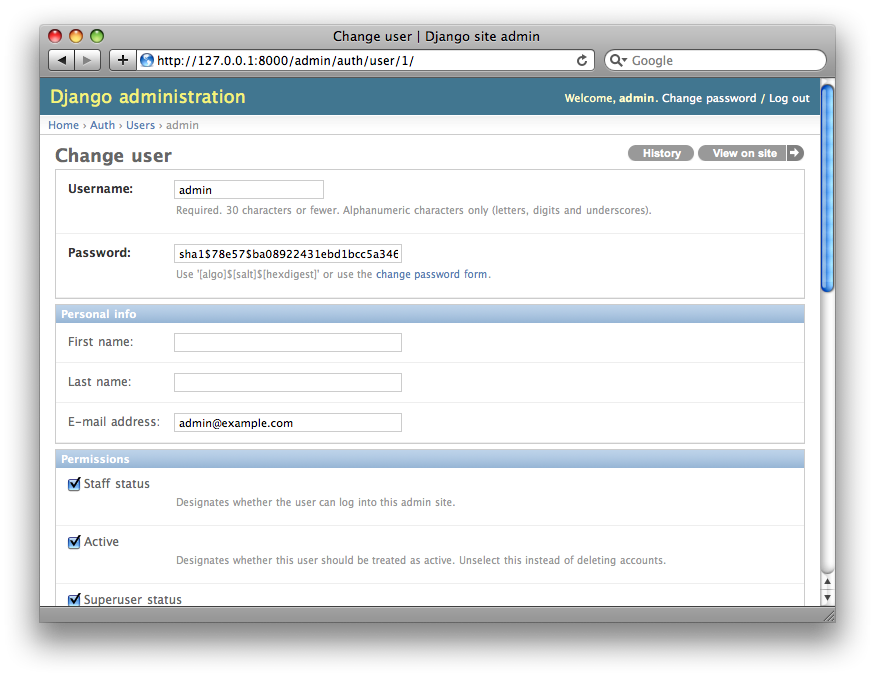
Figure 6-4. The user edit form
This page lets you change the attributes of the user, like the first/last names and various permissions. (Note that to change a user’s password, you should click “change password form” under the password field rather than editing the hashed code.) Another thing to note here is that fields of different types get different widgets – for example, date/time fields have calendar controls, boolean fields have checkboxes, character fields have simple text input fields.
You can delete a record by clicking the delete button at the bottom left of its edit form. That’ll take you to a confirmation page, which, in some cases, will display any dependent objects that will be deleted, too. (For example, if you delete a publisher, any book with that publisher will be deleted, too!)
You can add a record by clicking “Add” in the appropriate column of the admin home page. This will give you an empty version of the edit page, ready for you to fill out.
You’ll also notice that the admin interface also handles input validation for you. Try leaving a required field blank or putting an invalid date into a date field, and you’ll see those errors when you try to save, as shown in Figure 6-5.
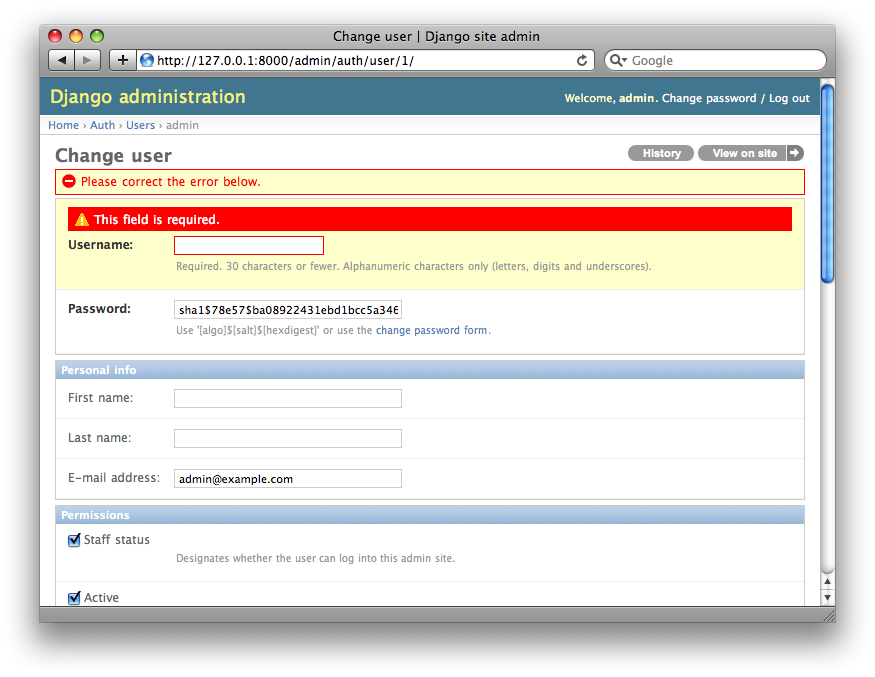
Figure 6-5. An edit form displaying errors
When you edit an existing object, you’ll notice a History link in the upper-right corner of the window. Every change made through the admin interface is logged, and you can examine this log by clicking the History link (see Figure 6-6).

Figure 6-6. An object history page
Adding Your Models to the Admin Site
There’s one crucial part we haven’t done yet. Let’s add our own models to the admin site, so we can add, change and delete objects in our custom database tables using this nice interface. We’ll continue the books example from Chapter 5, where we defined three models: Publisher, Author and Book.
Within the books directory (mysite/books), create a file called admin.py, and type in the following lines of code:
from django.contrib import admin
from mysite.books.models import Publisher, Author, Book

admin.site.register(Publisher)
admin.site.register(Author)
admin.site.register(Book)
This code tells the Django admin site to offer an interface for each of these models.
Once you’ve done this, go to your admin home page in your Web browser (http://127.0.0.1:8000/admin/), and you should see a “Books” section with links for Authors, Books and Publishers. (You might have to stop and start the runserver for the changes to take effect.)
You now have a fully functional admin interface for each of those three models. That was easy!
Take some time to add and change records, to populate your database with some data. If you followed Chapter 5’s examples of creating Publisher objects (and you didn’t delete them), you’ll already see those records on the publisher change list page.
One feature worth mentioning here is the admin site’s handling of foreign keys and many-to-many relationships, both of which appear in the Book model. As a reminder, here’s what the Book model looks like:
class Book(models.Model):
    title = models.CharField(max_length=100)
    authors = models.ManyToManyField(Author)
    publisher = models.ForeignKey(Publisher)
    publication_date = models.DateField()

    def __unicode__(self):
        return self.title
On the Django admin site’s “Add book” page (http://127.0.0.1:8000/admin/books/book/add/), the publisher (a ForeignKey) is represented by a select box, and the authors field (a ManyToManyField) is represented by a multiple-select box. Both fields sit next to a green plus sign icon that lets you add related records of that type. For example, if you click the green plus sign next to the “Publisher” field, you’ll get a pop-up window that lets you add a publisher. After you successfully create the publisher in the pop-up, the “Add book” form will be updated with the newly created publisher. Slick.
How the Admin Site Works
Behind the scenes, how does the admin site work? It’s pretty straightforward.
When Django loads your URLconf from urls.py at server startup, it executes the admin.autodiscover() statement that we added as part of activating the admin. This function iterates over your INSTALLED_APPS setting and looks for a file called admin.py in each installed app. If an admin.py exists in a given app, it executes the code in that file.
In the admin.py in our books app, each call to admin.site.register() simply registers the given model with the admin. The admin site will only display an edit/change interface for models that have been explicitly registered.
The app django.contrib.auth includes its own admin.py, which is why Users and Groups showed up automatically in the admin. Other django.contrib apps, such as django.contrib.redirects, also add themselves to the admin, as do many third-party Django applications you might download from the Web.
Beyond that, the Django admin site is just a Django application, with its own models, templates, views and URLpatterns. You add it to your application by hooking it into your URLconf, just as you hook in your own views. You can inspect its templates, views and URLpatterns by poking around in django/contrib/admin in your copy of the Django codebase – but don’t be tempted to change anything directly in there, as there are plenty of hooks for you to customize the way the admin site works. (If you do decide to poke around the Django admin application, keep in mind it does some rather complicated things in reading metadata about models, so it would probably take a good amount of time to read and understand the code.)
Making Fields Optional
After you play around with the admin site for a while, you’ll probably notice a limitation – the edit forms require every field to be filled out, whereas in many cases you’d want certain fields to be optional. Let’s say, for example, that we want our Author model’s email field to be optional – that is, a blank string should be allowed. In the real world, you might not have an e-mail address on file for every author.
To specify that the email field is optional, edit the Author model (which, as you’ll recall from Chapter 5, lives in mysite/books/models.py). Simply add blank=True to the email field, like so:
class Author(models.Model):
    first_name = models.CharField(max_length=30)
    last_name = models.CharField(max_length=40)
    email = models.EmailField(blank=True)
This tells Django that a blank value is indeed allowed for authors’ e-mail addresses. By default, all fields have blank=False, which means blank values are not allowed.
There’s something interesting happening here. Until now, with the exception of the __unicode__() method, our models have served as definitions of our database tables – Pythonic expressions of SQL CREATE TABLE statements, essentially. In adding blank=True, we have begun expanding our model beyond a simple definition of what the database table looks like. Now, our model class is starting to become a richer collection of knowledge about what Author objects are and what they can do. Not only is the email field represented by a VARCHAR column in the database; it’s also an optional field in contexts such as the Django admin site.
Once you’ve added that blank=True, reload the “Add author” edit form (http://127.0.0.1:8000/admin/books/author/add/), and you’ll notice the field’s label – “Email” – is no longer bolded. This signifies it’s not a required field. You can now add authors without needing to provide e-mail addresses; you won’t get the loud red “This field is required” message anymore, if the field is submitted empty.
Making Date and Numeric Fields Optional
A common gotcha related to blank=True has to do with date and numeric fields, but it requires a fair amount of background explanation.
SQL has its own way of specifying blank values – a special value called NULL. NULL could mean “unknown,” or “invalid,” or some other application-specific meaning.
In SQL, a value of NULL is different than an empty string, just as the special Python object None is different than an empty Python string (""). This means it’s possible for a particular character field (e.g., a VARCHAR column) to contain both NULL values and empty string values.
This can cause unwanted ambiguity and confusion: “Why does this record have a NULL but this other one has an empty string? Is there a difference, or was the data just entered inconsistently?” And: “How do I get all the records that have a blank value – should I look for both NULL records and empty strings, or do I only select the ones with empty strings?”
To help avoid such ambiguity, Django’s automatically generated CREATE TABLE statements (which were covered in Chapter 5) add an explicit NOT NULL to each column definition. For example, here’s the generated statement for our Author model, from Chapter 5:
CREATE TABLE "books_author" (
    "id" serial NOT NULL PRIMARY KEY,
    "first_name" varchar(30) NOT NULL,
    "last_name" varchar(40) NOT NULL,
    "email" varchar(75) NOT NULL
)
;
In most cases, this default behavior is optimal for your application and will save you from data-inconsistency headaches. And it works nicely with the rest of Django, such as the Django admin site, which inserts an empty string (not a NULL value) when you leave a character field blank.
But there’s an exception with database column types that do not accept empty strings as valid values – such as dates, times and numbers. If you try to insert an empty string into a date or integer column, you’ll likely get a database error, depending on which database you’re using. (PostgreSQL, which is strict, will raise an exception here; MySQL might accept it or might not, depending on the version you’re using, the time of day and the phase of the moon.) In this case, NULL is the only way to specify an empty value. In Django models, you can specify that NULL is allowed by adding null=True to a field.
So that’s a long way of saying this: if you want to allow blank values in a date field (e.g., DateField, TimeField, DateTimeField) or numeric field (e.g., IntegerField, DecimalField, FloatField), you’ll need to use both null=True and blank=True.
For sake of example, let’s change our Book model to allow a blank publication_date. Here’s the revised code:
class Book(models.Model):
    title = models.CharField(max_length=100)
    authors = models.ManyToManyField(Author)
    publisher = models.ForeignKey(Publisher)
    publication_date = models.DateField(blank=True, null=True)
Adding null=True is more complicated than adding blank=True, because null=True changes the semantics of the database – that is, it changes the CREATE TABLE statement to remove the NOT NULL from the publication_date field. To complete this change, we’ll need to update the database.
For a number of reasons, Django does not attempt to automate changes to database schemas, so it’s your own responsibility to execute the appropriate ALTER TABLE statement whenever you make such a change to a model. Recall that you can use manage.py dbshell to enter your database server’s shell. Here’s how to remove the NOT NULL in this particular case:
ALTER TABLE books_book ALTER COLUMN publication_date DROP NOT NULL;
(Note that this SQL syntax is specific to PostgreSQL.)
We’ll cover schema changes in more depth in Chapter 10.
Bringing this back to the admin site, now the “Add book” edit form should allow for empty publication date values.
Customizing Field Labels
On the admin site’s edit forms, each field’s label is generated from its model field name. The algorithm is simple: Django just replaces underscores with spaces and capitalizes the first character, so, for example, the Book model’s publication_date field has the label “Publication date.”
However, field names don’t always lend themselves to nice admin field labels, so in some cases you might want to customize a label. You can do this by specifying verbose_name in the appropriate model field.
For example, here’s how we can change the label of the Author.email field to “e-mail,” with a hyphen:
class Author(models.Model):
    first_name = models.CharField(max_length=30)
    last_name = models.CharField(max_length=40)
    email = models.EmailField(blank=True, verbose_name='e-mail')
Make that change and reload the server, and you should see the field’s new label on the author edit form.
Note that you shouldn’t capitalize the first letter of a verbose_name unless it should always be capitalized (e.g., "USA state"). Django will automatically capitalize it when it needs to, and it will use the exact verbose_name value in other places that don’t require capitalization.
Finally, note that you can pass the verbose_name as a positional argument, for a slightly more compact syntax. This example is equivalent to the previous one:
class Author(models.Model):
    first_name = models.CharField(max_length=30)
    last_name = models.CharField(max_length=40)
    email = models.EmailField('e-mail', blank=True)
This won’t work with ManyToManyField or ForeignKey fields, though, because they require the first argument to be a model class. In those cases, specifying verbose_name explicitly is the way to go.
Custom ModelAdmin classes
The changes we’ve made so far – blank=True, null=True and verbose_name – are really model-level changes, not admin-level changes. That is, these changes are fundamentally a part of the model and just so happen to be used by the admin site; there’s nothing admin-specific about them.
Beyond these, the Django admin site offers a wealth of options that let you customize how the admin site works for a particular model. Such options live in ModelAdmin classes, which are classes that contain configuration for a specific model in a specific admin site instance.
Customizing change lists
Let’s dive into admin customization by specifying the fields that are displayed on the change list for our Author model. By default, the change list displays the result of __unicode__() for each object. In Chapter 5, we defined the __unicode__() method for Author objects to display the first name and last name together:
class Author(models.Model):
    first_name = models.CharField(max_length=30)
    last_name = models.CharField(max_length=40)
    email = models.EmailField(blank=True, verbose_name='e-mail')

    def __unicode__(self):
        return u'%s %s' % (self.first_name, self.last_name)
As a result, the change list for Author objects displays each other’s first name and last name together, as you can see in Figure 6-7.
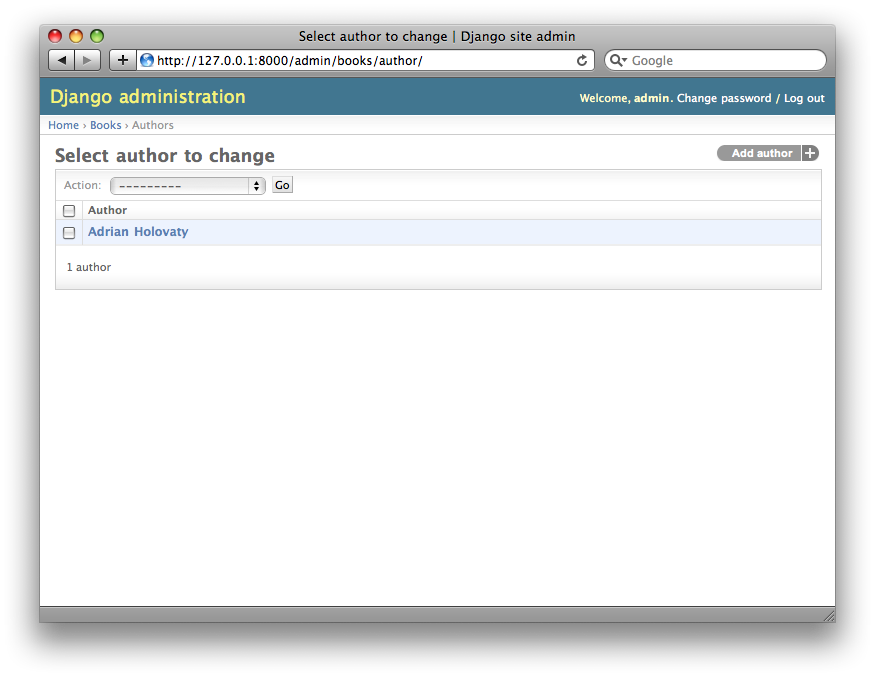
Figure 6-7. The author change list page
We can improve on this default behavior by adding a few other fields to the change list display. It’d be handy, for example, to see each author’s e-mail address in this list, and it’d be nice to be able to sort by first and last name.
To make this happen, we’ll define a ModelAdmin class for the Author model. This class is the key to customizing the admin, and one of the most basic things it lets you do is specify the list of fields to display on change list pages. Edit admin.py to make these changes:
from django.contrib import admin
from mysite.books.models import Publisher, Author, Book

class AuthorAdmin(admin.ModelAdmin):
    list_display = ('first_name', 'last_name', 'email')

admin.site.register(Publisher)
admin.site.register(Author, AuthorAdmin)
admin.site.register(Book)
Here’s what we’ve done:
We created the class AuthorAdmin. This class, which subclasses django.contrib.admin.ModelAdmin, holds custom configuration for a specific admin model. We’ve only specified one customization – list_display, which is set to a tuple of field names to display on the change list page. These field names must exist in the model, of course.
We altered the admin.site.register() call to add AuthorAdmin after Author. You can read this as: “Register the Author model with the AuthorAdmin options.”
The admin.site.register() function takes a ModelAdmin subclass as an optional second argument. If you don’t specify a second argument (as is the case for Publisher and Book), Django will use the default admin options for that model.
With that tweak made, reload the author change list page, and you’ll see it’s now displaying three columns – the first name, last name and e-mail address. In addition, each of those columns is sortable by clicking on the column header. (See Figure 6-8.)
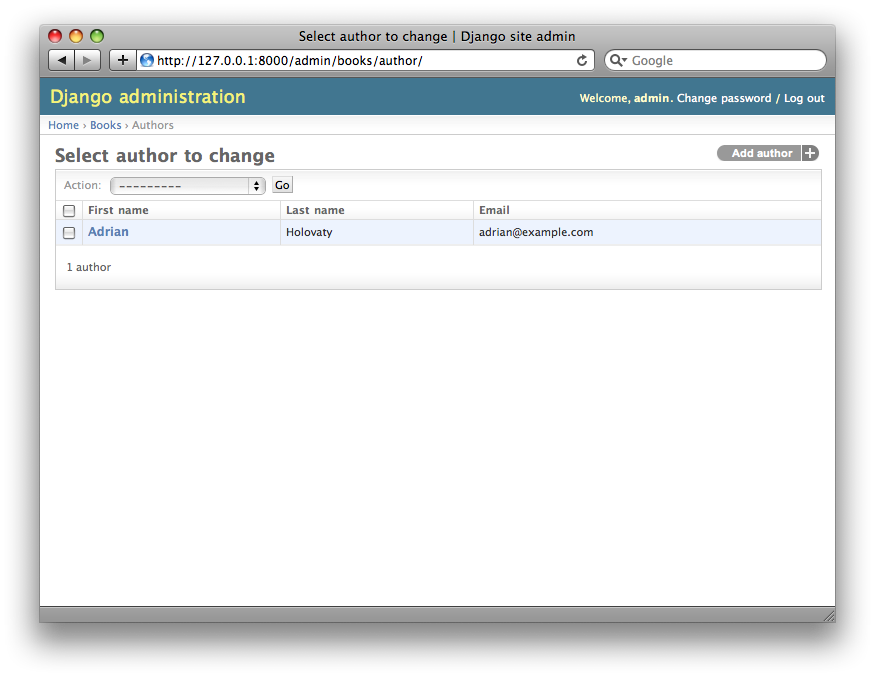
Figure 6-8. The author change list page after list_display
Next, let’s add a simple search bar. Add search_fields to the AuthorAdmin, like so:
class AuthorAdmin(admin.ModelAdmin):
    list_display = ('first_name', 'last_name', 'email')
    search_fields = ('first_name', 'last_name')
Reload the page in your browser, and you should see a search bar at the top. (See Figure 6-9.) We’ve just told the admin change list page to include a search bar that searches against the first_name and last_name fields. As a user might expect, this is case-insensitive and searches both fields, so searching for the string "bar" would find both an author with the first name Barney and an author with the last name Hobarson.
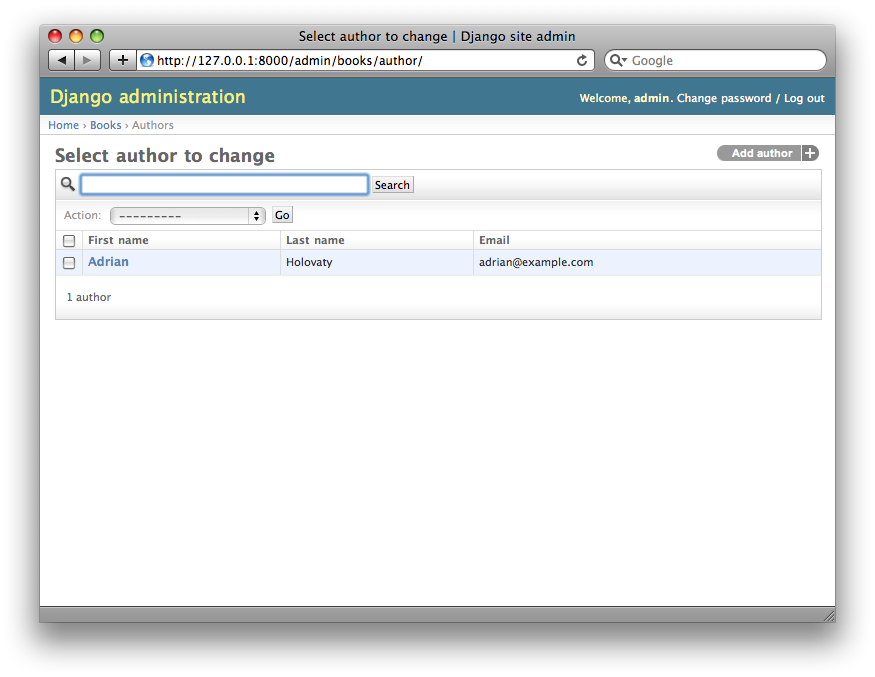
Figure 6-9. The author change list page after search_fields
Next, let’s add some date filters to our Book model’s change list page:
from django.contrib import admin
from mysite.books.models import Publisher, Author, Book

class AuthorAdmin(admin.ModelAdmin):
    list_display = ('first_name', 'last_name', 'email')
    search_fields = ('first_name', 'last_name')

class BookAdmin(admin.ModelAdmin):
    list_display = ('title', 'publisher', 'publication_date')
    list_filter = ('publication_date',)

admin.site.register(Publisher)
admin.site.register(Author, AuthorAdmin)
admin.site.register(Book, BookAdmin)
Here, because we’re dealing with a different set of options, we created a separate ModelAdmin class – BookAdmin. First, we defined a list_display just to make the change list look a bit nicer. Then, we used list_filter, which is set to a tuple of fields to use to create filters along the right side of the change list page. For date fields, Django provides shortcuts to filter the list to “Today,” “Past 7 days,” “This month” and “This year” – shortcuts that Django’s developers have found hit the common cases for filtering by date. Figure 6-10 shows what that looks like.

Figure 6-10. The book change list page after list_filter
list_filter also works on fields of other types, not just DateField. (Try it with BooleanField and ForeignKey fields, for example.) The filters show up as long as there are at least 2 values to choose from.
Another way to offer date filters is to use the date_hierarchy admin option, like this:
class BookAdmin(admin.ModelAdmin):
    list_display = ('title', 'publisher', 'publication_date')
    list_filter = ('publication_date',)
    date_hierarchy = 'publication_date'
With this in place, the change list page gets a date drill-down navigation bar at the top of the list, as shown in Figure 6-11. It starts with a list of available years, then drills down into months and individual days.
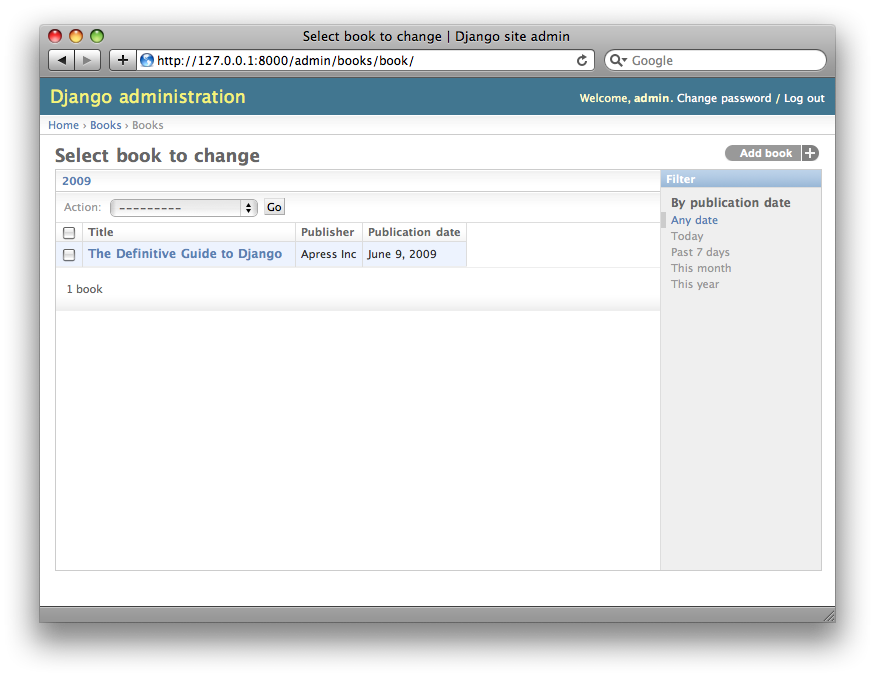
Figure 6-11. The book change list page after date_hierarchy
Note that date_hierarchy takes a string, not a tuple, because only one date field can be used to make the hierarchy.
Finally, let’s change the default ordering so that books on the change list page are always ordered descending by their publication date. By default, the change list orders objects according to their model’s ordering within class Meta (which we covered in Chapter 5) – but you haven’t specified this ordering value, then the ordering is undefined.
class BookAdmin(admin.ModelAdmin):
    list_display = ('title', 'publisher', 'publication_date')
    list_filter = ('publication_date',)
    date_hierarchy = 'publication_date'
    ordering = ('-publication_date',)
This admin ordering option works exactly as the ordering in models’ class Meta, except that it only uses the first field name in the list. Just pass a list or tuple of field names, and add a minus sign to a field to use descending sort order.
Reload the book change list to see this in action. Note that the “Publication date” header now includes a small arrow that indicates which way the records are sorted. (See Figure 6-12.)

Figure 6-12. The book change list page after ordering
We’ve covered the main change list options here. Using these options, you can make a very powerful, production-ready data-editing interface with only a few lines of code.
Customizing edit forms
Just as the change list can be customized, edit forms can be customized in many ways.
First, let’s customize the way fields are ordered. By default, the order of fields in an edit form corresponds to the order they’re defined in the model. We can change that using the fields option in our ModelAdmin subclass:
class BookAdmin(admin.ModelAdmin):
    list_display = ('title', 'publisher', 'publication_date')
    list_filter = ('publication_date',)
    date_hierarchy = 'publication_date'
    ordering = ('-publication_date',)
    fields = ('title', 'authors', 'publisher', 'publication_date')
After this change, the edit form for books will use the given ordering for fields. It’s slightly more natural to have the authors after the book title. Of course, the field order should depend on your data-entry workflow. Every form is different.
Another useful thing the fields option lets you do is to exclude certain fields from being edited entirely. Just leave out the field(s) you want to exclude. You might use this if your admin users are only trusted to edit a certain segment of your data, or if part of your fields are changed by some outside, automated process. For example, in our book database, we could hide the publication_date field from being editable:
class BookAdmin(admin.ModelAdmin):
    list_display = ('title', 'publisher', 'publication_date')
    list_filter = ('publication_date',)
    date_hierarchy = 'publication_date'
    ordering = ('-publication_date',)
    fields = ('title', 'authors', 'publisher')
As a result, the edit form for books doesn’t offer a way to specify the publication date. This could be useful, say, if you’re an editor who prefers that his authors not push back publication dates. (This is purely a hypothetical example, of course.)
When a user uses this incomplete form to add a new book, Django will simply set the publication_date to None – so make sure that field has null=True.
Another commonly used edit-form customization has to do with many-to-many fields. As we’ve seen on the edit form for books, the admin site represents each ManyToManyField as a multiple-select boxes, which is the most logical HTML input widget to use – but multiple-select boxes can be difficult to use. If you want to select multiple items, you have to hold down the control key, or command on a Mac, to do so. The admin site helpfully inserts a bit of text that explains this, but, still, it gets unwieldy when your field contains hundreds of options.
The admin site’s solution is filter_horizontal. Let’s add that to BookAdmin and see what it does.
class BookAdmin(admin.ModelAdmin):
    list_display = ('title', 'publisher', 'publication_date')
    list_filter = ('publication_date',)
    date_hierarchy = 'publication_date'
    ordering = ('-publication_date',)
    filter_horizontal = ('authors',)
(If you’re following along, note that we’ve also removed the fields option to restore all the fields in the edit form.)
Reload the edit form for books, and you’ll see that the “Authors” section now uses a fancy JavaScript filter interface that lets you search through the options dynamically and move specific authors from “Available authors” to the “Chosen authors” box, and vice versa.
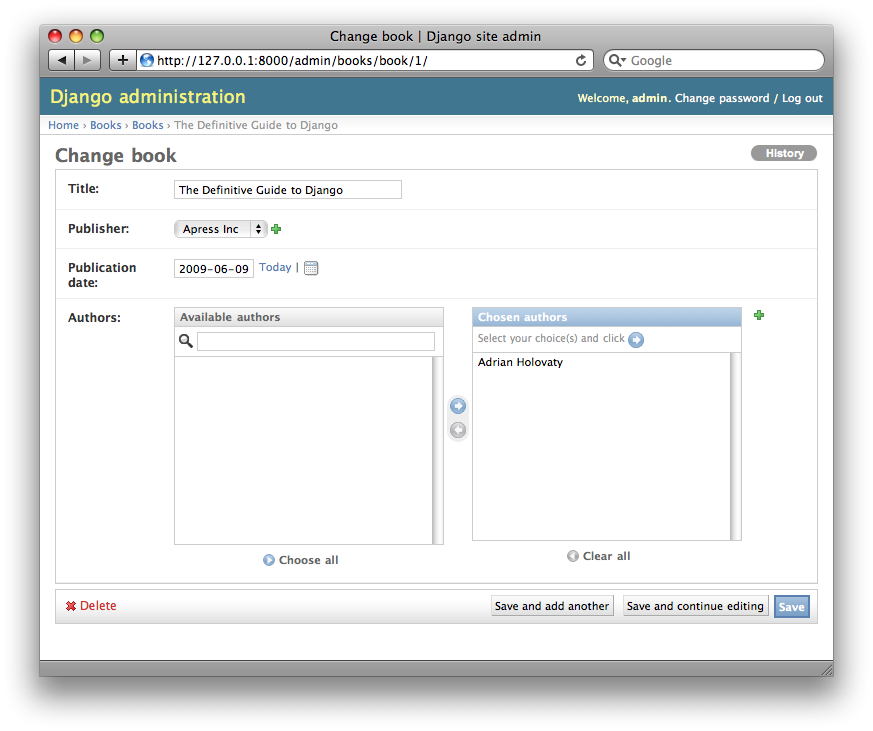
Figure 6-13. The book edit form after adding filter_horizontal
We’d highly recommend using filter_horizontal for any ManyToManyField that has more than 10 items. It’s far easier to use than a simple multiple-select widget. Also, note you can use filter_horizontal for multiple fields – just specify each name in the tuple.
ModelAdmin classes also support a filter_vertical option. This works exactly as filter_horizontal, but the resulting JavaScript interface stacks the two boxes vertically instead of horizontally. It’s a matter of personal taste.
filter_horizontal and filter_vertical only work on ManyToManyField fields, not ForeignKey fields. By default, the admin site uses simple <select> boxes for ForeignKey fields, but, as for ManyToManyField, sometimes you don’t want to incur the overhead of having to select all the related objects to display in the drop-down. For example, if our book database grows to include thousands of publishers, the “Add book” form could take a while to load, because it would have to load every publisher for display in the <select> box.
The way to fix this is to use an option called raw_id_fields. Set this to a tuple of ForeignKey field names, and those fields will be displayed in the admin with a simple text input box (<input type="text">) instead of a <select>. See Figure 6-14.
class BookAdmin(admin.ModelAdmin):
    list_display = ('title', 'publisher', 'publication_date')
    list_filter = ('publication_date',)
    date_hierarchy = 'publication_date'
    ordering = ('-publication_date',)
    filter_horizontal = ('authors',)
    raw_id_fields = ('publisher',)
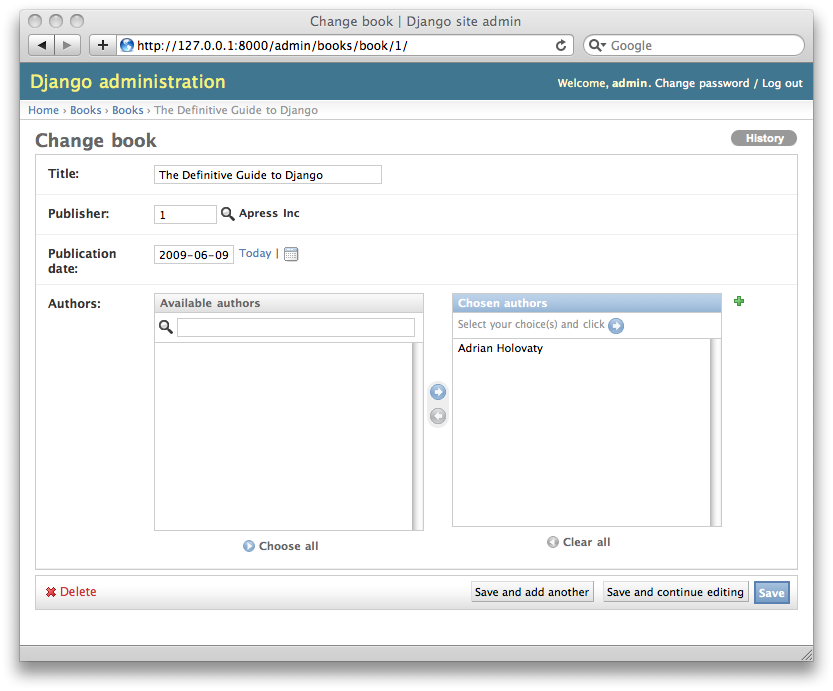
Figure 6-14. The book edit form after adding raw_id_fields
What do you enter in this input box? The database ID of the publisher. Given that humans don’t normally memorize database IDs, there’s also a magnifying-glass icon that you can click to pull up a pop-up window, from which you can select the publisher to add.
Users, Groups, and Permissions
Because you’re logged in as a superuser, you have access to create, edit, and delete any object. Naturally, different environments require different permission systems – not everybody can or should be a superuser. Django’s admin site uses a permissions system that you can use to give specific users access only to the portions of the interface that they need.
These user accounts are meant to be generic enough to be used outside of the admin interface, but we’ll just treat them as admin user accounts for now. In Chapter 14, we’ll cover how to integrate user accounts with the rest of your site (i.e., not just the admin site).
You can edit users and permissions through the admin interface just like any other object. We saw this earlier in this chapter, when we played around with the User and Group sections of the admin. User objects have the standard username, password, e-mail and real name fields you might expect, along with a set of fields that define what the user is allowed to do in the admin interface. First, there’s a set of three boolean flags:
- The “active” flag controls whether the user is active at all. If this flag is off and the user tries to log in, he won’t be allowed in, even with a valid password.
- The “staff” flag controls whether the user is allowed to log in to the admin interface (i.e., whether that user is considered a “staff member” in your organization). Since this same user system can be used to control access to public (i.e., non-admin) sites (see Chapter 14), this flag differentiates between public users and administrators.
- The “superuser” flag gives the user full access to add, create and delete any item in the admin interface. If a user has this flag set, then all regular permissions (or lack thereof) are ignored for that user.
“Normal” admin users – that is, active, non-superuser staff members – are granted admin access through assigned permissions. Each object editable through the admin interface (e.g., books, authors, publishers) has three permissions: a create permission, an edit permission and a delete permission. Assigning permissions to a user grants the user access to do what is described by those permissions.
When you create a user, that user has no permissions, and it’s up to you to give the user specific permissions. For example, you can give a user permission to add and change publishers, but not permission to delete them. Note that these permissions are defined per-model, not per-object – so they let you say “John can make changes to any book,” but they don’t let you say “John can make changes to any book published by Apress.” The latter functionality, per-object permissions, is a bit more complicated and is outside the scope of this book but is covered in the Django documentation.
Note
Access to edit users and permissions is also controlled by this permission system. If you give someone permission to edit users, she will be able to edit her own permissions, which might not be what you want! Giving a user permission to edit users is essentially turning a user into a superuser.
You can also assign users to groups. A group is simply a set of permissions to apply to all members of that group. Groups are useful for granting identical permissions to a subset of users.
When and Why to Use the Admin Interface – And When Not to
After having worked through this chapter, you should have a good idea of how to use Django’s admin site. But we want to make a point of covering when and why you might want to use it – and when not to use it.
Django’s admin site especially shines when nontechnical users need to be able to enter data; that’s the purpose behind the feature, after all. At the newspaper where Django was first developed, development of a typical online feature – say, a special report on water quality in the municipal supply – would go something like this:
- The reporter responsible for the project meets with one of the developers and describes the available data.
- The developer designs Django models to fit this data and then opens up the admin site to the reporter.
- The reporter inspects the admin site to point out any missing or extraneous fields – better now than later. The developer changes the models iteratively.
- When the models are agreed upon, the reporter begins entering data using the admin site. At the same time, the programmer can focus on developing the publicly accessible views/templates (the fun part!).
In other words, the raison d’être of Django’s admin interface is facilitating the simultaneous work of content producers and programmers.
However, beyond these obvious data entry tasks, the admin site is useful in a few other cases:
- Inspecting data models: Once you’ve defined a few models, it can be quite useful to call them up in the admin interface and enter some dummy data. In some cases, this might reveal data-modeling mistakes or other problems with your models.
- Managing acquired data: For applications that rely on data coming from external sources (e.g., users or Web crawlers), the admin site gives you an easy way to inspect or edit this data. You can think of it as a less powerful, but more convenient, version of your database’s command-line utility.
- Quick and dirty data-management apps: You can use the admin site to build yourself a very lightweight data management app – say, to keep track of expenses. If you’re just building something for your own needs, not for public consumption, the admin site can take you a long way. In this sense, you can think of it as a beefed up, relational version of a spreadsheet.
One final point we want to make clear is: the admin site is not an end-all-be-all. Over the years, we’ve seen it hacked and chopped up to serve a variety of functions it wasn’t intended to serve. It’s not intended to be a public interface to data, nor is it intended to allow for sophisticated sorting and searching of your data. As we said early in this chapter, it’s for trusted site administrators. Keeping this sweet spot in mind is the key to effective admin-site usage.
What’s Next?
So far we’ve created a few models and configured a top-notch interface for editing data. In the next chapter Chapter 7, we’ll move on to the real “meat and potatoes” of Web development: form creation and processing.
This work is licensed under the GNU Free Document License.