第四章:模板
在上一章里,你也许注意到了我们的示例视图中返回文本的方式有点儿古怪,我们直接把HTML硬写在 (hard-coded)Python代码中:
def current_datetime(request):
    now = datetime.datetime.now()
    html = "<html><body>It is now %s.</body></html>" % now
    return HttpResponse(html)
尽管这样做便于解释视图是如果工作的。但是直接将HTML hard code在视图里可不是一个好办法。 让我们来看下为什么:
- 对页面做任何的设计都需要去改动Python代码。站点设计上的修改往往比底层Python代码的改动频 繁得多。因此,如果可以在不影响底层代码的情况下改动设计会方便得多。
- 编写Python代码和HTML的设计是两项很不相同的工作,在大多数情况下,这两项任何会被分给不同 的人,甚至是不同的部门去完成。设计师和HTML/CSS程序员不需要懂得怎么去编写Python代码来完 成他们的工作。
- 程序员编写Python代码和设计师们也设计模板这两项工作可以同事进行效率是最高的,远胜于 一个人等着另一个人完成那个既包含Python又包含HTML的文件。
鉴于这些原因,将页面的设计和Python代码分离会更有助于保持代码的整洁和可维护性。这可以借助 Django的模板系统来实现,本章正是要讨论这个问题。
模板系统基础
A Django template is a string of text that is intended to separate the presentation of a document from its data. A template defines placeholders and various bits of basic logic (template tags) that regulate how the document should be displayed. Usually, templates are used for producing HTML, but Django templates are equally capable of generating any text-based format.
Let’s start with a simple example template. This Django template describes an HTML page that thanks a person for placing an order with a company. Think of it as a form letter:
<html>
<head><title>Ordering notice</title></head>

<body>

<h1>Ordering notice</h1>

<p>Dear {{ person_name }},</p>

<p>Thanks for placing an order from {{ company }}. It's scheduled to
ship on {{ ship_date|date:"F j, Y" }}.</p>

<p>Here are the items you've ordered:</p>

<ul>
{% for item in item_list %}
    <li>{{ item }}</li>
{% endfor %}
</ul>

{% if ordered_warranty %}
    <p>Your warranty information will be included in the packaging.</p>
{% else %}
    <p>You didn't order a warranty, so you're on your own when
    the products inevitably stop working.</p>
{% endif %}

<p>Sincerely,<br />{{ company }}</p>

</body>
</html>
This template is basic HTML with some variables and template tags thrown in. Let’s step through it:
Any text surrounded by a pair of braces (e.g., {{ person_name }}) is a variable. This means “insert the value of the variable with the given name.” (How do we specify the values of the variables? We’ll get to that in a moment.)
Any text that’s surrounded by curly braces and percent signs (e.g., {% if ordered_warranty %}) is a template tag. The definition of a tag is quite broad: a tag just tells the template system to “do something.”
This example template contains a for tag ({% for item in item_list %}) and an if tag ({% if ordered_warranty %}).
A for tag works very much like a for statement in Python, letting you loop over each item in a sequence. An if tag, as you may expect, acts as a logical “if” statement. In this particular case, the tag checks whether the value of the ordered_warranty variable evaluates to True. If it does, the template system will display everything between the {% if ordered_warranty %} and {% else %}. If not, the template system will display everything between {% else %} and {% endif %}. Note that the {% else %} is optional.
Finally, the second paragraph of this template contains an example of a filter, which is the most convenient way to alter the formatting of a variable. In this example, {{ ship_date|date:"F j, Y" }}, we’re passing the ship_date variable to the date filter, giving the date filter the argument "F j, Y". The date filter formats dates in a given format, as specified by that argument. Filters are attached using a pipe character (|), as a reference to Unix pipes.
Each Django template has access to several built-in tags and filters, many of which are discussed in the sections that follow. Appendix E contains the full list of tags and filters, and it’s a good idea to familiarize yourself with that list so you know what’s possible. It’s also possible to create your own filters and tags; we’ll cover that in Chapter 9.
Using the Template System
Let’s dive into Django’s template system so you can see how it works – but we’re not yet going to integrate it with the views that we created in the previous chapter. Our goal here is to show you how the system works independently of the rest of Django. (Put another way: usually you’ll be using the template system within a Django view, but we want to make it clear that the template system is just a Python library that you can use anywhere, not just in Django views.)
Here is the most basic way you can use Django’s template system in Python code:
- Create a Template object by providing the raw template code as a string.
- Call the render() method of the Template object with a given set of variables (the context). This returns a fully rendered template as a string, with all of the variables and template tags evaluated according to the context.
In code, here’s what that looks like:
>>> from django import template
>>> t = template.Template('My name is {{ name }}.')
>>> c = template.Context({'name': 'Adrian'})
>>> print t.render(c)
My name is Adrian.
>>> c = template.Context({'name': 'Fred'})
>>> print t.render(c)
My name is Fred.
The following sections describe each step in much more detail.
Creating Template Objects
The easiest way to create a Template object is to instantiate it directly. The Template class lives in the django.template module, and the constructor takes one argument, the raw template code. Let’s dip into the Python interactive interpreter to see how this works in code.
From the mysite project directory created by django-admin.py startproject (as covered in Chapter 2), type python manage.py shell to start the interactive interpreter.
A special Python prompt
If you’ve used Python before, you may be wondering why we’re running python manage.py shell instead of just python. Both commands will start the interactive interpreter, but the manage.py shell command has one key difference: before starting the interpreter, it tells Django which settings file to use. Many parts of Django, including the template system, rely on your settings, and you won’t be able to use them unless the framework knows which settings to use.
If you’re curious, here’s how it works behind the scenes. Django looks for an environment variable called DJANGO_SETTINGS_MODULE, which should be set to the import path of your settings.py. For example, DJANGO_SETTINGS_MODULE might be set to 'mysite.settings', assuming mysite is on your Python path.
When you run python manage.py shell, the command takes care of setting DJANGO_SETTINGS_MODULE for you. We’re encouraging you to use python manage.py shell in these examples so as to minimize the amount of tweaking and configuring you have to do.
Let’s go through some template system basics:
>>> from django.template import Template
>>> t = Template('My name is {{ name }}.')
>>> print t
If you’re following along interactively, you’ll see something like this:
<django.template.Template object at 0xb7d5f24c>
That 0xb7d5f24c will be different every time, and it isn’t relevant; it’s a Python thing (the Python “identity” of the Template object, if you must know).
When you create a Template object, the template system compiles the raw template code into an internal, optimized form, ready for rendering. But if your template code includes any syntax errors, the call to Template() will cause a TemplateSyntaxError exception:
>>> from django.template import Template
>>> t = Template('{% notatag %}')
Traceback (most recent call last):
  File "<stdin>", line 1, in ?
  ...
django.template.TemplateSyntaxError: Invalid block tag: 'notatag'
The term “block tag” here refers to {% notatag %}. “Block tag” and “template tag” are synonymous.
The system raises a TemplateSyntaxError exception for any of the following cases:
- Invalid tags
- Invalid arguments to valid tags
- Invalid filters
- Invalid arguments to valid filters
- Invalid template syntax
- Unclosed tags (for tags that require closing tags)
Rendering a Template
Once you have a Template object, you can pass it data by giving it a context. A context is simply a set of template variable names and their associated values. A template uses this to populate its variables and evaluate its tags.
A context is represented in Django by the Context class, which lives in the django.template module. Its constructor takes one optional argument: a dictionary mapping variable names to variable values. Call the Template object’s render() method with the context to “fill” the template:
>>> from django.template import Context, Template
>>> t = Template('My name is {{ name }}.')
>>> c = Context({'name': 'Stephane'})
>>> t.render(c)
u'My name is Stephane.'
One thing we should point out here is that the return value of t.render(c) is a Unicode object – not a normal Python string. You can tell this by the u in front of the string. Django uses Unicode objects instead of normal strings throughout the framework. If you understand the repercussions of that, be thankful for the sophisticated things Django does behind the scenes to make it work. If you don’t understand the repercussions of that, don’t worry for now; just know that Django’s Unicode support makes it relatively painless for your applications to support a wide variety of character sets beyond the basic “A-Z” of the English language.
Dictionaries and Contexts
A Python dictionary is a mapping between known keys and variable values. A Context is similar to a dictionary, but a Context provides additional functionality, as covered in Chapter 9.
Variable names must begin with a letter (A-Z or a-z) and may contain more letters, digits, underscores, and dots. (Dots are a special case we’ll get to in a moment.) Variable names are case sensitive.
Here’s an example of template compilation and rendering, using a template similar to the example in the beginning of this chapter:
>>> from django.template import Template, Context
>>> raw_template = """<p>Dear {{ person_name }},</p>
...
... <p>Thanks for placing an order from {{ company }}. It's scheduled to
... ship on {{ ship_date|date:"F j, Y" }}.</p>
...
... {% if ordered_warranty %}
... <p>Your warranty information will be included in the packaging.</p>
... {% else %}
... <p>You didn't order a warranty, so you're on your own when
... the products inevitably stop working.</p>
... {% endif %}
...
... <p>Sincerely,<br />{{ company }}</p>"""
>>> t = Template(raw_template)
>>> import datetime
>>> c = Context({'person_name': 'John Smith',
...     'company': 'Outdoor Equipment',
...     'ship_date': datetime.date(2009, 4, 2),
...     'ordered_warranty': False})
>>> t.render(c)
u"<p>Dear John Smith,</p>\n\n<p>Thanks for placing an order from Outdoor
Equipment. It's scheduled to\nship on April 2, 2009.</p>\n\n\n<p>You
didn't order a warranty, so you're on your own when\nthe products
inevitably stop working.</p>\n\n\n<p>Sincerely,<br />Outdoor Equipment
</p>"
Let’s step through this code one statement at a time:
First, we import the classes Template and Context, which both live in the module django.template.
We save the raw text of our template into the variable raw_template. Note that we use triple quote marks to designate the string, because it wraps over multiple lines; in contrast, strings within single quote marks cannot be wrapped over multiple lines.
Next, we create a template object, t, by passing raw_template to the Template class constructor.
We import the datetime module from Python’s standard library, because we’ll need it in the following statement.
Then, we create a Context object, c. The Context constructor takes a Python dictionary, which maps variable names to values. Here, for example, we specify that the person_name is 'John Smith', company is 'Outdoor Equipment', and so forth.
Finally, we call the render() method on our template object, passing it the context. This returns the rendered template – i.e., it replaces template variables with the actual values of the variables, and it executes any template tags.
Note that the “You didn’t order a warranty” paragraph was displayed because the ordered_warranty variable evaluated to False. Also note the date, April 2, 2009, which is displayed according to the format string 'F j, Y'. (We’ll explain format strings for the date filter in a little while.)
If you’re new to Python, you may wonder why this output includes newline characters ('\n') rather than displaying the line breaks. That’s happening because of a subtlety in the Python interactive interpreter: the call to t.render(c) returns a string, and by default the interactive interpreter displays the representation of the string, rather than the printed value of the string. If you want to see the string with line breaks displayed as true line breaks rather than '\n' characters, use the print statement: print t.render(c).
Those are the fundamentals of using the Django template system: just write a template string, create a Template object, create a Context, and call the render() method.
Multiple Contexts, Same Template
Once you have a Template object, you can render multiple contexts through it. For example:
>>> from django.template import Template, Context
>>> t = Template('Hello, {{ name }}')
>>> print t.render(Context({'name': 'John'}))
Hello, John
>>> print t.render(Context({'name': 'Julie'}))
Hello, Julie
>>> print t.render(Context({'name': 'Pat'}))
Hello, Pat
Whenever you’re using the same template source to render multiple contexts like this, it’s more efficient to create the Template object once, and then call render() on it multiple times:
# Bad
for name in ('John', 'Julie', 'Pat'):
    t = Template('Hello, {{ name }}')
    print t.render(Context({'name': name}))

# Good
t = Template('Hello, {{ name }}')
for name in ('John', 'Julie', 'Pat'):
    print t.render(Context({'name': name}))
Django’s template parsing is quite fast. Behind the scenes, most of the parsing happens via a call to a single regular expression. This is in stark contrast to XML-based template engines, which incur the overhead of an XML parser and tend to be orders of magnitude slower than Django’s template rendering engine.
Context Variable Lookup
In the examples so far, we’ve passed simple values in the contexts – mostly strings, plus a datetime.date example. However, the template system elegantly handles more complex data structures, such as lists, dictionaries, and custom objects.
The key to traversing complex data structures in Django templates is the dot character (.). Use a dot to access dictionary keys, attributes, methods, or indices of an object.
This is best illustrated with a few examples. For instance, suppose you’re passing a Python dictionary to a template. To access the values of that dictionary by dictionary key, use a dot:
>>> from django.template import Template, Context
>>> person = {'name': 'Sally', 'age': '43'}
>>> t = Template('{{ person.name }} is {{ person.age }} years old.')
>>> c = Context({'person': person})
>>> t.render(c)
u'Sally is 43 years old.'
Similarly, dots also allow access of object attributes. For example, a Python datetime.date object has year, month, and day attributes, and you can use a dot to access those attributes in a Django template:
>>> from django.template import Template, Context
>>> import datetime
>>> d = datetime.date(1993, 5, 2)
>>> d.year
1993
>>> d.month
5
>>> d.day
2
>>> t = Template('The month is {{ date.month }} and the year is {{ date.year }}.')
>>> c = Context({'date': d})
>>> t.render(c)
u'The month is 5 and the year is 1993.'
This example uses a custom class, demonstrating that variable dots also allow attribute access on arbitrary objects:
>>> from django.template import Template, Context
>>> class Person(object):
...     def __init__(self, first_name, last_name):
...         self.first_name, self.last_name = first_name, last_name
>>> t = Template('Hello, {{ person.first_name }} {{ person.last_name }}.')
>>> c = Context({'person': Person('John', 'Smith')})
>>> t.render(c)
u'Hello, John Smith.'
Dots can also refer to methods on objects. For example, each Python string has the methods upper() and isdigit(), and you can call those in Django templates using the same dot syntax:
>>> from django.template import Template, Context
>>> t = Template('{{ var }} -- {{ var.upper }} -- {{ var.isdigit }}')
>>> t.render(Context({'var': 'hello'}))
u'hello -- HELLO -- False'
>>> t.render(Context({'var': '123'}))
u'123 -- 123 -- True'
Note that you do not include parentheses in the method calls. Also, it’s not possible to pass arguments to the methods; you can only call methods that have no required arguments. (We explain this philosophy later in this chapter.)
Finally, dots are also used to access list indices, for example:
>>> from django.template import Template, Context
>>> t = Template('Item 2 is {{ items.2 }}.')
>>> c = Context({'items': ['apples', 'bananas', 'carrots']})
>>> t.render(c)
u'Item 2 is carrots.'
Negative list indices are not allowed. For example, the template variable {{ items.-1 }} would cause a TemplateSyntaxError.
Python Lists
A reminder: Python lists have 0-based indices. The first item is at index 0, the second is at index 1, and so on.
Dot lookups can be summarized like this: when the template system encounters a dot in a variable name, it tries the following lookups, in this order:
- Dictionary lookup (e.g., foo["bar"])
- Attribute lookup (e.g., foo.bar)
- Method call (e.g., foo.bar())
- List-index lookup (e.g., foo[2])
The system uses the first lookup type that works. It’s short-circuit logic.
Dot lookups can be nested multiple levels deep. For instance, the following example uses {{ person.name.upper }}, which translates into a dictionary lookup (person['name']) and then a method call (upper()):
>>> from django.template import Template, Context
>>> person = {'name': 'Sally', 'age': '43'}
>>> t = Template('{{ person.name.upper }} is {{ person.age }} years old.')
>>> c = Context({'person': person})
>>> t.render(c)
u'SALLY is 43 years old.'
Method Call Behavior
Method calls are slightly more complex than the other lookup types. Here are some things to keep in mind:
If, during the method lookup, a method raises an exception, the exception will be propagated, unless the exception has an attribute silent_variable_failure whose value is True. If the exception does have a silent_variable_failure attribute, the variable will render as an empty string, for example:
>>> t = Template("My name is {{ person.first_name }}.")
>>> class PersonClass3:
...     def first_name(self):
...         raise AssertionError, "foo"
>>> p = PersonClass3()
>>> t.render(Context({"person": p}))
Traceback (most recent call last):
...
AssertionError: foo

>>> class SilentAssertionError(AssertionError):
...     silent_variable_failure = True
>>> class PersonClass4:
...     def first_name(self):
...         raise SilentAssertionError
>>> p = PersonClass4()
>>> t.render(Context({"person": p}))
u'My name is .'
A method call will only work if the method has no required arguments. Otherwise, the system will move to the next lookup type (list-index lookup).
Obviously, some methods have side effects, and it would be foolish at best, and possibly even a security hole, to allow the template system to access them.
Say, for instance, you have a BankAccount object that has a delete() method. If a template includes something like {{ account.delete }}, where account is a BankAccount object, the object would be deleted when the template is rendered!
To prevent this, set the function attribute alters_data on the method:
def delete(self):
    # Delete the account
delete.alters_data = True
The template system won’t execute any method marked in this way. Continuing the above example, if a template includes {{ account.delete }} and the delete() method has the alters_data=True, then the delete() method will not be executed when the template is rendered. Instead, it will fail silently.
How Invalid Variables Are Handled
By default, if a variable doesn’t exist, the template system renders it as an empty string, failing silently. For example:
>>> from django.template import Template, Context
>>> t = Template('Your name is {{ name }}.')
>>> t.render(Context())
u'Your name is .'
>>> t.render(Context({'var': 'hello'}))
u'Your name is .'
>>> t.render(Context({'NAME': 'hello'}))
u'Your name is .'
>>> t.render(Context({'Name': 'hello'}))
u'Your name is .'
The system fails silently rather than raising an exception because it’s intended to be resilient to human error. In this case, all of the lookups failed because variable names have the wrong case or name. In the real world, it’s unacceptable for a Web site to become inaccessible due to a small template syntax error.
Playing with Context Objects
Most of the time, you’ll instantiate Context objects by passing in a fully populated dictionary to Context(). But you can add and delete items from a Context object once it’s been instantiated, too, using standard Python dictionary syntax:
>>> from django.template import Context
>>> c = Context({"foo": "bar"})
>>> c['foo']
'bar'
>>> del c['foo']
>>> c['foo']
Traceback (most recent call last):
  ...
KeyError: 'foo'
>>> c['newvariable'] = 'hello'
>>> c['newvariable']
'hello'
Basic Template Tags and Filters
As we’ve mentioned already, the template system ships with built-in tags and filters. The sections that follow provide a rundown of the most common tags and filters.
Tags
if/else
The {% if %} tag evaluates a variable, and if that variable is “True” (i.e., it exists, is not empty, and is not a false Boolean value), the system will display everything between {% if %} and {% endif %}, for example:
{% if today_is_weekend %}
    <p>Welcome to the weekend!</p>
{% endif %}
An {% else %} tag is optional:
{% if today_is_weekend %}
    <p>Welcome to the weekend!</p>
{% else %}
    <p>Get back to work.</p>
{% endif %}
Python “Truthiness”
In Python and in the Django template system, these objects evaluate to False in a Boolean context:
- An empty list ([])
- An empty tuple (())
- An empty dictionary ({})
- An empty string ('')
- Zero (0)
- The special object None
- The object False (obviously)
- Custom objects that define their own Boolean context behavior (this is advanced Python usage)
Everything else evaluates to True.
The {% if %} tag accepts and, or, or not for testing multiple variables, or to negate a given variable. For example:
{% if athlete_list and coach_list %}
    Both athletes and coaches are available.
{% endif %}

{% if not athlete_list %}
    There are no athletes.
{% endif %}

{% if athlete_list or coach_list %}
    There are some athletes or some coaches.
{% endif %}

{% if not athlete_list or coach_list %}
    There are no athletes or there are some coaches.
{% endif %}

{% if athlete_list and not coach_list %}
    There are some athletes and absolutely no coaches.
{% endif %}
{% if %} tags don’t allow and and or clauses within the same tag, because the order of logic would be ambiguous. For example, this is invalid:
{% if athlete_list and coach_list or cheerleader_list %}
The use of parentheses for controlling order of operations is not supported. If you find yourself needing parentheses, consider performing logic outside the template and passing the result of that as a dedicated template variable. Or, just use nested {% if %} tags, like this:
{% if athlete_list %}
    {% if coach_list or cheerleader_list %}
        We have athletes, and either coaches or cheerleaders!
    {% endif %}
{% endif %}
Multiple uses of the same logical operator are fine, but you can’t combine different operators. For example, this is valid:
{% if athlete_list or coach_list or parent_list or teacher_list %}
There is no {% elif %} tag. Use nested {% if %} tags to accomplish the same thing:
{% if athlete_list %}
    <p>Here are the athletes: {{ athlete_list }}.</p>
{% else %}
    <p>No athletes are available.</p>
    {% if coach_list %}
        <p>Here are the coaches: {{ coach_list }}.</p>
    {% endif %}
{% endif %}
Make sure to close each {% if %} with an {% endif %}. Otherwise, Django will throw a TemplateSyntaxError.
for
The {% for %} tag allows you to loop over each item in a sequence. As in Python’s for statement, the syntax is for X in Y, where Y is the sequence to loop over and X is the name of the variable to use for a particular cycle of the loop. Each time through the loop, the template system will render everything between {% for %} and {% endfor %}.
For example, you could use the following to display a list of athletes given a variable athlete_list:
<ul>
{% for athlete in athlete_list %}
    <li>{{ athlete.name }}</li>
{% endfor %}
</ul>
Add reversed to the tag to loop over the list in reverse:
{% for athlete in athlete_list reversed %}
...
{% endfor %}
It’s possible to nest {% for %} tags:
{% for athlete in athlete_list %}
    <h1>{{ athlete.name }}</h1>
    <ul>
    {% for sport in athlete.sports_played %}
        <li>{{ sport }}</li>
    {% endfor %}
    </ul>
{% endfor %}
A common pattern is to check the size of the list before looping over it, and outputting some special text if the list is empty:
{% if athlete_list %}
    {% for athlete in athlete_list %}
        <p>{{ athlete.name }}</p>
    {% endfor %}
{% else %}
    <p>There are no athletes. Only computer programmers.</p>
{% endif %}
Because this pattern is so common, the for tag supports an optional {% empty %} clause that lets you define what to output if the list is empty. This example is equivalent to the previous one:
{% for athlete in athlete_list %}
    <p>{{ athlete.name }}</p>
{% empty %}
    <p>There are no athletes. Only computer programmers.</p>
{% endfor %}
There is no support for “breaking out” of a loop before the loop is finished. If you want to accomplish this, change the variable you’re looping over so that it includes only the values you want to loop over. Similarly, there is no support for a “continue” statement that would instruct the loop processor to return immediately to the front of the loop. (See the section “Philosophies and Limitations” later in this chapter for the reasoning behind this design decision.)
Within each {% for %} loop, you get access to a template variable called forloop. This variable has a few attributes that give you information about the progress of the loop:
forloop.counter is always set to an integer representing the number of times the loop has been entered. This is one-indexed, so the first time through the loop, forloop.counter will be set to 1. Here’s an example:
{% for item in todo_list %}
    <p>{{ forloop.counter }}: {{ item }}</p>
{% endfor %}
forloop.counter0 is like forloop.counter, except it’s zero-indexed. Its value will be set to 0 the first time through the loop.
forloop.revcounter is always set to an integer representing the number of remaining items in the loop. The first time through the loop, forloop.revcounter will be set to the total number of items in the sequence you’re traversing. The last time through the loop, forloop.revcounter will be set to 1.
forloop.revcounter0 is like forloop.revcounter, except it’s zero-indexed. The first time through the loop, forloop.revcounter0 will be set to the number of elements in the sequence minus 1. The last time through the loop, it will be set to 0.
forloop.first is a Boolean value set to True if this is the first time through the loop. This is convenient for special-casing:
{% for object in objects %}
    {% if forloop.first %}<li class="first">{% else %}<li>{% endif %}
    {{ object }}
    </li>
{% endfor %}
forloop.last is a Boolean value set to True if this is the last time through the loop. A common use for this is to put pipe characters between a list of links:
{% for link in links %}{{ link }}{% if not forloop.last %} | {% endif %}{% endfor %}The above template code might output something like this:
Link1 | Link2 | Link3 | Link4
Another common use for this is to put a comma between words in a list:
Favorite places:
{% for p in places %}{{ p }}{% if not forloop.last %}, {% endif %}{% endfor %}
forloop.parentloop is a reference to the forloop object for the parent loop, in case of nested loops. Here’s an example:
{% for country in countries %}
    <table>
    {% for city in country.city_list %}
        <tr>
        <td>Country #{{ forloop.parentloop.counter }}</td>
        <td>City #{{ forloop.counter }}</td>
        <td>{{ city }}</td>
        </tr>
    {% endfor %}
    </table>
{% endfor %}
The magic forloop variable is only available within loops. After the template parser has reached {% endfor %}, forloop disappears.
Context and the forloop Variable
Inside the {% for %} block, the existing variables are moved out of the way to avoid overwriting the magic forloop variable. Django exposes this moved context in forloop.parentloop. You generally don’t need to worry about this, but if you supply a template variable named forloop (though we advise against it), it will be named forloop.parentloop while inside the {% for %} block.
ifequal/ifnotequal
The Django template system deliberately is not a full-fledged programming language and thus does not allow you to execute arbitrary Python statements. (More on this idea in the section “Philosophies and Limitations.”) However, it’s quite a common template requirement to compare two values and display something if they’re equal – and Django provides an {% ifequal %} tag for that purpose.
The {% ifequal %} tag compares two values and displays everything between {% ifequal %} and {% endifequal %} if the values are equal.
This example compares the template variables user and currentuser:
{% ifequal user currentuser %}
    <h1>Welcome!</h1>
{% endifequal %}
The arguments can be hard-coded strings, with either single or double quotes, so the following is valid:
{% ifequal section 'sitenews' %}
    <h1>Site News</h1>
{% endifequal %}

{% ifequal section "community" %}
    <h1>Community</h1>
{% endifequal %}
Just like {% if %}, the {% ifequal %} tag supports an optional {% else %}:
{% ifequal section 'sitenews' %}
    <h1>Site News</h1>
{% else %}
    <h1>No News Here</h1>
{% endifequal %}
Only template variables, strings, integers, and decimal numbers are allowed as arguments to {% ifequal %}. These are valid examples:
{% ifequal variable 1 %}
{% ifequal variable 1.23 %}
{% ifequal variable 'foo' %}
{% ifequal variable "foo" %}
Any other types of variables, such as Python dictionaries, lists, or Booleans, can’t be hard-coded in {% ifequal %}. These are invalid examples:
{% ifequal variable True %}
{% ifequal variable [1, 2, 3] %}
{% ifequal variable {'key': 'value'} %}
If you need to test whether something is true or false, use the {% if %} tags instead of {% ifequal %}.
Comments
Just as in HTML or Python, the Django template language allows for comments. To designate a comment, use {# #}:
{# This is a comment #}
The comment will not be output when the template is rendered.
Comments using this syntax cannot span multiple lines. This limitation improves template parsing performance. In the following template, the rendered output will look exactly the same as the template (i.e., the comment tag will not be parsed as a comment):
This is a {# this is not
a comment #}
test.
If you want to use multi-line comments, use the {% comment %} template tag, like this:
{% comment %}
This is a
multi-line comment.
{% endcomment %}
Filters
As explained earlier in this chapter, template filters are simple ways of altering the value of variables before they’re displayed. Filters use a pipe character, like this:
{{ name|lower }}
This displays the value of the {{ name }} variable after being filtered through the lower filter, which converts text to lowercase.
Filters can be chained – that is, they can be used in tandem such that the output of one filter is applied to the next. Here’s an example that takes the first element in a list and converts it to uppercase:
{{ my_list|first|upper }}
Some filters take arguments. A filter argument comes after a colon and is always in double quotes. For example:
{{ bio|truncatewords:"30" }}
This displays the first 30 words of the bio variable.
The following are a few of the most important filters. Appendix E covers the rest.
addslashes: Adds a backslash before any backslash, single quote, or double quote. This is useful if the produced text is included in a JavaScript string.
date: Formats a date or datetime object according to a format string given in the parameter, for example:
{{ pub_date|date:"F j, Y" }}
Format strings are defined in Appendix E.
length: Returns the length of the value. For a list, this returns the number of elements. For a string, this returns the number of characters. (Python experts, take note that this works on any Python object that knows how to determine its length – i.e., any object that has a __len__() method.)
Philosophies and Limitations
Now that you’ve gotten a feel for the Django template language, we should point out some of its intentional limitations, along with some philosophies behind why it works the way it works.
More than any other component of Web applications, template syntax is highly subjective, and programmers’ opinions vary wildly. The fact that Python alone has dozens, if not hundreds, of open source template-language implementations supports this point. Each was likely created because its developer deemed all existing template languages inadequate. (In fact, it is said to be a rite of passage for a Python developer to write his or her own template language! If you haven’t done this yet, consider it. It’s a fun exercise.)
With that in mind, you might be interested to know that Django doesn’t require that you use its template language. Because Django is intended to be a full-stack Web framework that provides all the pieces necessary for Web developers to be productive, many times it’s more convenient to use Django’s template system than other Python template libraries, but it’s not a strict requirement in any sense. As you’ll see in the upcoming section “Using Templates in Views”, it’s very easy to use another template language with Django.
Still, it’s clear we have a strong preference for the way Django’s template language works. The template system has roots in how Web development is done at World Online and the combined experience of Django’s creators. Here are a few of those philosophies:
Business logic should be separated from presentation logic. Django’s developers see a template system as a tool that controls presentation and presentation-related logic – and that’s it. The template system shouldn’t support functionality that goes beyond this basic goal.
For that reason, it’s impossible to call Python code directly within Django templates. All “programming” is fundamentally limited to the scope of what template tags can do. It is possible to write custom template tags that do arbitrary things, but the out-of-the-box Django template tags intentionally do not allow for arbitrary Python code execution.
Syntax should be decoupled from HTML/XML. Although Django’s template system is used primarily to produce HTML, it’s intended to be just as usable for non-HTML formats, such as plain text. Some other template languages are XML based, placing all template logic within XML tags or attributes, but Django deliberately avoids this limitation. Requiring valid XML to write templates introduces a world of human mistakes and hard-to-understand error messages, and using an XML engine to parse templates incurs an unacceptable level of overhead in template processing.
Designers are assumed to be comfortable with HTML code. The template system isn’t designed so that templates necessarily are displayed nicely in WYSIWYG editors such as Dreamweaver. That is too severe a limitation and wouldn’t allow the syntax to be as friendly as it is. Django expects template authors to be comfortable editing HTML directly.
Designers are assumed not to be Python programmers. The template system authors recognize that Web page templates are most often written by designers, not programmers, and therefore should not assume Python knowledge.
However, the system also intends to accommodate small teams in which the templates are created by Python programmers. It offers a way to extend the system’s syntax by writing raw Python code. (More on this in Chapter 9.)
The goal is not to invent a programming language. The goal is to offer just enough programming-esque functionality, such as branching and looping, that is essential for making presentation-related decisions.
Using Templates in Views
You’ve learned the basics of using the template system; now let’s use this knowledge to create a view. Recall the current_datetime view in mysite.views, which we started in the previous chapter. Here’s what it looks like:
from django.http import HttpResponse
import datetime

def current_datetime(request):
    now = datetime.datetime.now()
    html = "<html><body>It is now %s.</body></html>" % now
    return HttpResponse(html)
Let’s change this view to use Django’s template system. At first, you might think to do something like this:
from django.template import Template, Context
from django.http import HttpResponse
import datetime

def current_datetime(request):
    now = datetime.datetime.now()
    t = Template("<html><body>It is now {{ current_date }}.</body></html>")
    html = t.render(Context({'current_date': now}))
    return HttpResponse(html)
Sure, that uses the template system, but it doesn’t solve the problems we pointed out in the introduction of this chapter. Namely, the template is still embedded in the Python code, so true separation of data and presentation isn’t achieved. Let’s fix that by putting the template in a separate file, which this view will load.
You might first consider saving your template somewhere on your filesystem and using Python’s built-in file-opening functionality to read the contents of the template. Here’s what that might look like, assuming the template was saved as the file /home/djangouser/templates/mytemplate.html:
from django.template import Template, Context
from django.http import HttpResponse
import datetime

def current_datetime(request):
    now = datetime.datetime.now()
    # Simple way of using templates from the filesystem.
    # This is BAD because it doesn't account for missing files!
    fp = open('/home/djangouser/templates/mytemplate.html')
    t = Template(fp.read())
    fp.close()
    html = t.render(Context({'current_date': now}))
    return HttpResponse(html)
This approach, however, is inelegant for these reasons:
- It doesn’t handle the case of a missing file. If the file mytemplate.html doesn’t exist or isn’t readable, the open() call will raise an IOError exception.
- It hard-codes your template location. If you were to use this technique for every view function, you’d be duplicating the template locations. Not to mention it involves a lot of typing!
- It includes a lot of boring boilerplate code. You’ve got better things to do than to write calls to open(), fp.read(), and fp.close() each time you load a template.
To solve these issues, we’ll use template loading and template directories.
Template Loading
Django provides a convenient and powerful API for loading templates from the filesystem, with the goal of removing redundancy both in your template-loading calls and in your templates themselves.
In order to use this template-loading API, first you’ll need to tell the framework where you store your templates. The place to do this is in your settings file – the settings.py file that we mentioned last chapter, when we introduced the ROOT_URLCONF setting.
If you’re following along, open your settings.py and find the TEMPLATE_DIRS setting. By default, it’s an empty tuple, likely containing some auto-generated comments:
TEMPLATE_DIRS = (
    # Put strings here, like "/home/html/django_templates" or "C:/www/django/templates".
    # Always use forward slashes, even on Windows.
    # Don't forget to use absolute paths, not relative paths.
)
This setting tells Django’s template-loading mechanism where to look for templates. Pick a directory where you’d like to store your templates and add it to TEMPLATE_DIRS, like so:
TEMPLATE_DIRS = (
    '/home/django/mysite/templates',
)
There are a few things to note:
You can specify any directory you want, as long as the directory and templates within that directory are readable by the user account under which your Web server runs. If you can’t think of an appropriate place to put your templates, we recommend creating a templates directory within your project (i.e., within the mysite directory you created in Chapter 2).
If your TEMPLATE_DIRS contains only one directory, don’t forget the comma at the end of the directory string!
Bad:
# Missing comma!
TEMPLATE_DIRS = (
    '/home/django/mysite/templates'
)
Good:
# Comma correctly in place.
TEMPLATE_DIRS = (
    '/home/django/mysite/templates',
)
The reason for this is that Python requires commas within single-element tuples to disambiguate the tuple from a parenthetical expression. This is a common newbie gotcha.
If you’re on Windows, include your drive letter and use Unix-style forward slashes rather than backslashes, as follows:
TEMPLATE_DIRS = (
    'C:/www/django/templates',
)
It’s simplest to use absolute paths (i.e., directory paths that start at the root of the filesystem). If you want to be a bit more flexible and decoupled, though, you can take advantage of the fact that Django settings files are just Python code by constructing the contents of TEMPLATE_DIRS dynamically. For example:
import os.path

TEMPLATE_DIRS = (
    os.path.join(os.path.dirname(__file__), 'templates').replace('\\','/'),
)
This example uses the “magic” Python variable __file__, which is automatically set to the file name of the Python module in which the code lives. It gets the name of the directory that contains settings.py (os.path.dirname), then joins that with templates in a cross-platform way (os.path.join), then ensures that everything uses forward slashes instead of backslashes (in case of Windows).
While we’re on the topic of dynamic Python code in settings files, we should point out that it’s very important to avoid Python errors in your settings file. If you introduce a syntax error, or a runtime error, your Django-powered site will likely crash.
With TEMPLATE_DIRS set, the next step is to change the view code to use Django’s template-loading functionality rather than hard-coding the template paths. Returning to our current_datetime view, let’s change it like so:
from django.template.loader import get_template
from django.template import Context
from django.http import HttpResponse
import datetime

def current_datetime(request):
    now = datetime.datetime.now()
    t = get_template('current_datetime.html')
    html = t.render(Context({'current_date': now}))
    return HttpResponse(html)
In this example, we’re using the function django.template.loader.get_template() rather than loading the template from the filesystem manually. The get_template() function takes a template name as its argument, figures out where the template lives on the filesystem, opens that file, and returns a compiled Template object.
Our template in this example is current_datetime.html, but there’s nothing special about that .html extension. You can give your templates whatever extension makes sense for your application, or you can leave off extensions entirely.
To determine the location of the template on your filesystem, get_template() combines your template directories from TEMPLATE_DIRS with the template name that you pass to get_template(). For example, if your TEMPLATE_DIRS is set to '/home/django/mysite/templates', the above get_template() call would look for the template /home/django/mysite/templates/current_datetime.html.
If get_template() cannot find the template with the given name, it raises a TemplateDoesNotExist exception. To see what that looks like, fire up the Django development server again by running python manage.py runserver within your Django project’s directory. Then, point your browser at the page that activates the current_datetime view (e.g., http://127.0.0.1:8000/time/). Assuming your DEBUG setting is set to True and you haven’t yet created a current_datetime.html template, you should see a Django error page highlighting the TemplateDoesNotExist error.
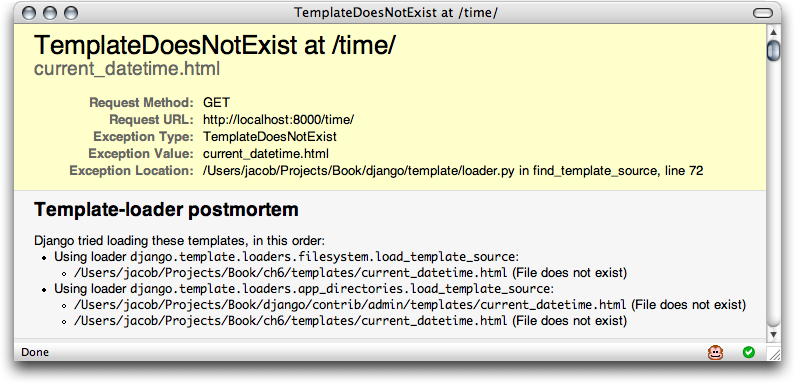
Figure 4-1: The error page shown when a template cannot be found.
This error page is similar to the one we explained in Chapter 3, with one additional piece of debugging information: a “Template-loader postmortem” section. This section tells you which templates Django tried to load, along with the reason each attempt failed (e.g., “File does not exist”). This information is invaluable when you’re trying to debug template-loading errors.
Moving along, create the current_datetime.html file within your template directory using the following template code:
<html><body>It is now {{ current_date }}.</body></html>
Refresh the page in your Web browser, and you should see the fully rendered page.
render()
We’ve shown you how to load a template, fill a Context and return an HttpResponse object with the result of the rendered template. We’ve optimized it to use get_template() instead of hard-coding templates and template paths. But it still requires a fair amount of typing to do those things. Because this is such a common idiom, Django provides a shortcut that lets you load a template, render it and return an HttpResponse – all in one line of code.
This shortcut is a function called render(), which lives in the module django.shortcuts. Most of the time, you’ll be using render() rather than loading templates and creating Context and HttpResponse objects manually – unless your employer judges your work by total lines of code written, that is.
Here’s the ongoing current_datetime example rewritten to use render():
from django.shortcuts import render
import datetime

def current_datetime(request):
    now = datetime.datetime.now()
    return render(request, 'current_datetime.html', {'current_date': now})
What a difference! Let’s step through the code changes:
- We no longer have to import get_template, Template, Context, or HttpResponse. Instead, we import django.shortcuts.render. The import datetime remains.
- Within the current_datetime function, we still calculate now, but the template loading, context creation, template rendering, and HttpResponse creation are all taken care of by the render() call. Because render() returns an HttpResponse object, we can simply return that value in the view.
The first argument to render() is the request, the second is the name of the template to use. The third argument, if given, should be a dictionary to use in creating a Context for that template. If you don’t provide a third argument, render() will use an empty dictionary.
Subdirectories in get_template()
It can get unwieldy to store all of your templates in a single directory. You might like to store templates in subdirectories of your template directory, and that’s fine. In fact, we recommend doing so; some more advanced Django features (such as the generic views system, which we cover in Chapter 11) expect this template layout as a default convention.
Storing templates in subdirectories of your template directory is easy. In your calls to get_template(), just include the subdirectory name and a slash before the template name, like so:
t = get_template('dateapp/current_datetime.html')
Because render() is a small wrapper around get_template(), you can do the same thing with the second argument to render(), like this:
return render(request, 'dateapp/current_datetime.html', {'current_date': now})
There’s no limit to the depth of your subdirectory tree. Feel free to use as many subdirectories as you like.
Note
Windows users, be sure to use forward slashes rather than backslashes. get_template() assumes a Unix-style file name designation.
The include Template Tag
Now that we’ve covered the template-loading mechanism, we can introduce a built-in template tag that takes advantage of it: {% include %}. This tag allows you to include the contents of another template. The argument to the tag should be the name of the template to include, and the template name can be either a variable or a hard-coded (quoted) string, in either single or double quotes. Anytime you have the same code in multiple templates, consider using an {% include %} to remove the duplication.
These two examples include the contents of the template nav.html. The examples are equivalent and illustrate that either single or double quotes are allowed:
{% include 'nav.html' %}
{% include "nav.html" %}
This example includes the contents of the template includes/nav.html:
{% include 'includes/nav.html' %}
This example includes the contents of the template whose name is contained in the variable template_name:
{% include template_name %}
As in get_template(), the file name of the template is determined by adding the template directory from TEMPLATE_DIRS to the requested template name.
Included templates are evaluated with the context of the template that’s including them. For example, consider these two templates:
# mypage.html

<html>
<body>
{% include "includes/nav.html" %}
<h1>{{ title }}</h1>
</body>
</html>

# includes/nav.html

<div id="nav">
    You are in: {{ current_section }}
</div>
If you render mypage.html with a context containing current_section, then the variable will be available in the “included” template, as you would expect.
If, in an {% include %} tag, a template with the given name isn’t found, Django will do one of two things:
- If DEBUG is set to True, you’ll see the TemplateDoesNotExist exception on a Django error page.
- If DEBUG is set to False, the tag will fail silently, displaying nothing in the place of the tag.
Template Inheritance
Our template examples so far have been tiny HTML snippets, but in the real world, you’ll be using Django’s template system to create entire HTML pages. This leads to a common Web development problem: across a Web site, how does one reduce the duplication and redundancy of common page areas, such as sitewide navigation?
A classic way of solving this problem is to use server-side includes, directives you can embed within your HTML pages to “include” one Web page inside another. Indeed, Django supports that approach, with the {% include %} template tag just described. But the preferred way of solving this problem with Django is to use a more elegant strategy called template inheritance.
In essence, template inheritance lets you build a base “skeleton” template that contains all the common parts of your site and defines “blocks” that child templates can override.
Let’s see an example of this by creating a more complete template for our current_datetime view, by editing the current_datetime.html file:
<!DOCTYPE HTML PUBLIC "-//W3C//DTD HTML 4.01//EN">
<html lang="en">
<head>
    <title>The current time</title>
</head>
<body>
    <h1>My helpful timestamp site</h1>
    <p>It is now {{ current_date }}.</p>

    <hr>
    <p>Thanks for visiting my site.</p>
</body>
</html>
That looks just fine, but what happens when we want to create a template for another view – say, the hours_ahead view from Chapter 3? If we want again to make a nice, valid, full HTML template, we’d create something like:
<!DOCTYPE HTML PUBLIC "-//W3C//DTD HTML 4.01//EN">
<html lang="en">
<head>
    <title>Future time</title>
</head>
<body>
    <h1>My helpful timestamp site</h1>
    <p>In {{ hour_offset }} hour(s), it will be {{ next_time }}.</p>

    <hr>
    <p>Thanks for visiting my site.</p>
</body>
</html>
Clearly, we’ve just duplicated a lot of HTML. Imagine if we had a more typical site, including a navigation bar, a few style sheets, perhaps some JavaScript – we’d end up putting all sorts of redundant HTML into each template.
The server-side include solution to this problem is to factor out the common bits in both templates and save them in separate template snippets, which are then included in each template. Perhaps you’d store the top bit of the template in a file called header.html:
<!DOCTYPE HTML PUBLIC "-//W3C//DTD HTML 4.01//EN">
<html lang="en">
<head>
And perhaps you’d store the bottom bit in a file called footer.html:
    <hr>
    <p>Thanks for visiting my site.</p>
</body>
</html>
With an include-based strategy, headers and footers are easy. It’s the middle ground that’s messy. In this example, both pages feature a title – <h1>My helpful timestamp site</h1> – but that title can’t fit into header.html because the <title> on both pages is different. If we included the <h1> in the header, we’d have to include the <title>, which wouldn’t allow us to customize it per page. See where this is going?
Django’s template inheritance system solves these problems. You can think of it as an “inside-out” version of server-side includes. Instead of defining the snippets that are common, you define the snippets that are different.
The first step is to define a base template – a skeleton of your page that child templates will later fill in. Here’s a base template for our ongoing example:
<!DOCTYPE HTML PUBLIC "-//W3C//DTD HTML 4.01//EN">
<html lang="en">
<head>
    <title>{% block title %}{% endblock %}</title>
</head>
<body>
    <h1>My helpful timestamp site</h1>
    {% block content %}{% endblock %}
    {% block footer %}
    <hr>
    <p>Thanks for visiting my site.</p>
    {% endblock %}
</body>
</html>
This template, which we’ll call base.html, defines a simple HTML skeleton document that we’ll use for all the pages on the site. It’s the job of child templates to override, or add to, or leave alone the contents of the blocks. (If you’re following along, save this file to your template directory as base.html.)
We’re using a template tag here that you haven’t seen before: the {% block %} tag. All the {% block %} tags do is tell the template engine that a child template may override those portions of the template.
Now that we have this base template, we can modify our existing current_datetime.html template to use it:
{% extends "base.html" %}

{% block title %}The current time{% endblock %}

{% block content %}
<p>It is now {{ current_date }}.</p>
{% endblock %}
While we’re at it, let’s create a template for the hours_ahead view from Chapter 3. (If you’re following along with code, we’ll leave it up to you to change hours_ahead to use the template system instead of hard-coded HTML.) Here’s what that could look like:
{% extends "base.html" %}

{% block title %}Future time{% endblock %}

{% block content %}
<p>In {{ hour_offset }} hour(s), it will be {{ next_time }}.</p>
{% endblock %}
Isn’t this beautiful? Each template contains only the code that’s unique to that template. No redundancy needed. If you need to make a site-wide design change, just make the change to base.html, and all of the other templates will immediately reflect the change.
Here’s how it works. When you load the template current_datetime.html, the template engine sees the {% extends %} tag, noting that this template is a child template. The engine immediately loads the parent template – in this case, base.html.
At that point, the template engine notices the three {% block %} tags in base.html and replaces those blocks with the contents of the child template. So, the title we’ve defined in {% block title %} will be used, as will the {% block content %}.
Note that since the child template doesn’t define the footer block, the template system uses the value from the parent template instead. Content within a {% block %} tag in a parent template is always used as a fallback.
Inheritance doesn’t affect the template context. In other words, any template in the inheritance tree will have access to every one of your template variables from the context.
You can use as many levels of inheritance as needed. One common way of using inheritance is the following three-level approach:
- Create a base.html template that holds the main look and feel of your site. This is the stuff that rarely, if ever, changes.
- Create a base_SECTION.html template for each “section” of your site (e.g., base_photos.html and base_forum.html). These templates extend base.html and include section-specific styles/design.
- Create individual templates for each type of page, such as a forum page or a photo gallery. These templates extend the appropriate section template.
This approach maximizes code reuse and makes it easy to add items to shared areas, such as section-wide navigation.
Here are some guidelines for working with template inheritance:
- If you use {% extends %} in a template, it must be the first template tag in that template. Otherwise, template inheritance won’t work.
- Generally, the more {% block %} tags in your base templates, the better. Remember, child templates don’t have to define all parent blocks, so you can fill in reasonable defaults in a number of blocks, and then define only the ones you need in the child templates. It’s better to have more hooks than fewer hooks.
- If you find yourself duplicating code in a number of templates, it probably means you should move that code to a {% block %} in a parent template.
- If you need to get the content of the block from the parent template, use {{ block.super }}, which is a “magic” variable providing the rendered text of the parent template. This is useful if you want to add to the contents of a parent block instead of completely overriding it.
- You may not define multiple {% block %} tags with the same name in the same template. This limitation exists because a block tag works in “both” directions. That is, a block tag doesn’t just provide a hole to fill, it also defines the content that fills the hole in the parent. If there were two similarly named {% block %} tags in a template, that template’s parent wouldn’t know which one of the blocks’ content to use.
- The template name you pass to {% extends %} is loaded using the same method that get_template() uses. That is, the template name is appended to your TEMPLATE_DIRS setting.
- In most cases, the argument to {% extends %} will be a string, but it can also be a variable, if you don’t know the name of the parent template until runtime. This lets you do some cool, dynamic stuff.
What’s next?
You now have the basics of Django’s template system under your belt. What’s next?
Many modern Web sites are database-driven: the content of the Web site is stored in a relational database. This allows a clean separation of data and logic (in the same way views and templates allow the separation of logic and display.)
The next chapter Chapter 5 covers the tools Django gives you to interact with a database.
This work is licensed under the GNU Free Document License.